Bracelets made of silicone laces with weaving patterns. Bracelets made of cords. Ideas, examples, master class. How to weave bracelets from laces
What types of cord bracelets there are, their types and photo examples, we’ll look at them today. In the master class we will assemble a bracelet with our own hands from colored waxed cords and beads.
Decorations made from cords occupy an important place in modern fashion. And all because this jewelry turns out to be very unique. Such products always attract the attention of others and at the same time, they can either slightly emphasize the image or be the main element. Today we will look at ideas for jewelry made from cords in the form of bracelets. For their work, craftsmen use a variety of cords, which are dictated by the technique of certain types of bracelets or their own imagination: twisted, waxed, leather, rubber, cords for shamballa, etc.
Ideas for simple types of cord bracelets, from laconic to voluminous:


Types of cord bracelets with various knots and patterns:


Bracelets made of cords with the addition of various accessories: chains, beads, separators, etc.


Single-row and multi-row bracelets made of cords with interlacing beads:


And of course, jewelry made from cords in the form of Shamballa bracelets:


Master class on a bracelet made from multi-colored waxed cords and beads.
Accessories:
Waxed yellow cord - 2m
Green waxed cord - 2m
The cord is tight - 20 cm
End springs - 2 pcs.
Carabiner lock - 1 piece
Tools: Scissors, round nose pliers

Assembly:
Let's prepare three cords. Green and yellow waxed cord, 2 meters each, and thick black cord, 20 cm long. We tie a knot of thin waxed cords around a tight cord. Tighten tightly.

We place the edge with the knot into the end spring. We clamp the last twisted ring of the spring with round pliers and thereby fix the edge of the product.

We begin to weave a pattern. We place the black cord in the center between the black and yellow cord. We pass the yellow cord under the black cord, bring it to the top and pass it through the resulting loop. We tighten it.

We repeat the steps again and braid the black cord with yellow cord 10 times.

We string a bead onto the green cord and then braid it around the black cord in the same way as we braided it with the yellow one.


Try to weave the knots tightly together and tighten them a little after every 10 knots to form a small wave or ruffle pattern.

In this way we weave the entire length that we need for the bracelet.

We shape the second edge as at the very beginning using a spring end and connect its loops with a carabiner lock. The bracelet is ready!

A beautiful accessory - a bracelet made from laces with your own hands
Bracelets are a beautiful accessory; they decorate the wrists of both women and men. Jewelry stores offer a huge selection of bracelets made of gold, silver, platinum, decorated with precious stones. There are bracelets made from natural materials (jasper, amber, turquoise, etc.). Recently, it has become popular to wear handmade ones.
They are made of beads or laces; beads, small buttons and other elements that you can easily find in special stores can be used as decoration. Such accessories are suitable for different styles and types of clothing. By creating a bracelet with your own hands, you can choose those elements and details that will suit your look, complement it and add some zest.
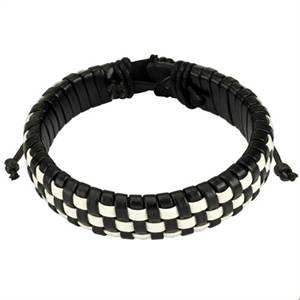
To make it we will need laces of different colors. Let's focus on the classic color combination (silver and black). This bracelet's color scheme will suit any outfit.
First you need to purchase one black lace and 4 silver ones of medium thickness (they should be thinner - you can use guitar strings). In this case, it is necessary to choose the right length of the black cord so that the future bracelet does not squeeze or slip off the wrist.

Calculate and leave room for the future fastener. Lay the laces on a flat surface. Black should be located in the middle, silver on the sides (2 on each side). Braid a standard braid, using only silver laces, braid them around the black one.

Then 2 silver laces must be placed under the black one, crossing them and tightening them thoroughly. Do the same with the remaining two laces on the opposite side. When this process is complete, cross the silver laces over the black ones and tighten. Do this with each lace. At the end, you should have free ends of the silver laces at the edges, and the black ones will be braided.
Now let's start making the clasp for the bracelet. To do this, you need to find a piece of black leather, cut a small square out of it, take a button slightly smaller than the standard size and, placing it on the edge of the leather, press it with your finger. Using an awl or scissors, make two holes in the square and thread 2 silver laces into each. Then tie them in a knot on a black cord. Trim off excess. Attach a button to the front side with black thread.
At the second end of the bracelet, make a loop from the remaining silver laces that would fit the size of the button. Do not make it too large so that the bracelet does not open when you move your hand. After all the details have been secured, excess, unnecessary remnants have been removed, you can safely put on a fashion accessory and show off your new thing.
I'm starting to make this bracelet, first I need to decide on the color of the laces. Those who have been weaving baubles for a long time know that certain colors mean different states of mind. So, for example, the combination of red and yellow indicates that a person is experiencing strong love feelings, pink color speaks of romance in a relationship, burning passion. Therefore, choose colors that reflect your current state.
Then you need to decide on the size of the bracelet. Multiply this number by 4 and get the length of the laces that you will use when weaving. On average, this figure is usually 1 m. Tie all available laces with a tight knot.

Bracelet weaving technique - baubles from laces
Before you start, you need to decide how wide you want your bracelet to be. This will determine how many laces you need to use. After this, secure the laces with a pin on a surface that will be comfortable for you to work with so that the laces do not get tangled during the work process. This could be the armrest of a sofa, or the headboard of a bed.
So, take the outermost lace on the right side and tie it to the remaining ones one by one. Thus, you should end up with a diagonal strip consisting of knots. Continue doing the same with the remaining rows of laces. When the process is complete, braid the remaining ends into a braid.
If you want to diversify the pattern, you can weave the laces from the bottom up to the middle, and then start weaving from top to bottom, when the laces meet, tie them in a knot.
Every girl dreams of an accessory that looks not only beautiful, fashionable, stylish, but also feminine. You can add tenderness and dilute rough laces with the help of beads.
To do this, take a couple of laces and beads that will match the color. The laces must be aligned and, leaving a little space from the ends, secured in a knot. To make it easier to weave, attach the knot with a pin to a pillow or other object (the back of a sofa).

Separate the laces, pull them tight and wrap the main lace, and it is better to do this from left to right. Thread a lace into the resulting loop and move the knot slightly upward. Make the second knot in the same way, while trying to make it as close as possible to the first. Now the laces have “swapped roles.” Continue making the left knot, in the same way only in a mirror image. Next, simply alternate weaving processes.
After the work is finished, the ends that remain need to be tied into a knot and the unnecessary remains trimmed off.
To make such a bracelet you will need 5 leather laces of different thicknesses. You can choose any clasp at your discretion (carabiner, leather tie).
Connect the laces and tie them in a knot. “Hide” the end of the thinnest cord behind all the others, so the bracelet will turn out neater.

Start braiding your hair (you can use any type of braid). Braid to the length you need. After this, tie the ends with a knot, trim the remaining laces, attach the clasp and your bracelet is ready.
Weaving bracelets is a very interesting activity. Create bracelets for yourself that will match your clothes and complement your look, or that will become...
Woven products, not only bracelets, but also belts for clothes, collars and cuffs, necklaces and headbands, scarves and stoles, bags and clutches, covers for phones and chair seats and much more, consist of knots, the tying technique of which can be easily found in such needlework as macrame. Macrame has its roots in Ancient Egypt, Greece, Iran, Peru and China. People of those times tied stone axes with similar knots and knitted mats. To this day, macrame is popular among both the female and male half of humanity. You will find patterns for weaving bracelets from laces below in the material.
Men, of course, do not wear jewelry, but they can wear a minimalist stylish bracelet made of knitted or leather cords. Women's jewelry is more varied and a woman has to have a large number of them in her wardrobe, matching them with each of her outfits, but in order not to spend your entire budget on beautiful things, you can weave an original bracelet yourself. For a woven bracelet, various materials are used: threads of different composition, incl. and floss, beads, satin and leather ribbons, fabric, knitted and leather laces, and to make the bracelet more attractive, it is recommended to add beads of different sizes and colors.
Selection of schemes
Below is a selection of patterns for weaving bracelets from laces.
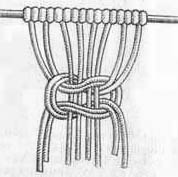
1) The most common knot in woven bracelets is the double flat knot.


2) The next weaving option is “Tatting” knots with “picot” air loops along the weaving. Tatting knots are also called left and right loop knots.


Here the tatting knots are woven not on one knotted cord, but on two.
3) The Josephine knot (another name for the bow knot) is another way to weave a lovely bracelet.

4) The Turkish knot or also called the “Turkish head” knot is very popular among lovers of bracelets with interesting patterns.


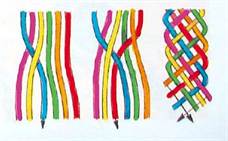
5) Weaving various braids from 3, 4, 5 and 6 laces does not cause difficulties for beginning craftswomen.


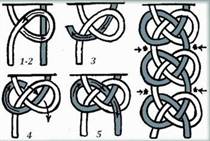
6) A Celtic knot (“Heart” knot) can be woven one for the entire bracelet and simply tie the ends of the laces.


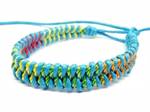
Bracelet made of laces and beads
In the following example, you can consider the step-by-step weaving of a bracelet from laces and beads.

You must first measure the size of your wrist with a centimeter and buy a cord 4 times longer than your wrist size, because... you need a reserve for knots, you will also need 9 large beads of different colors and 2 smaller beads for ties.
The color of the cord does not have to be black, the choice depends on desire.
The knot used to weave this bracelet is called a double flat knot.
First of all, you need to cut the cord into three cords of different lengths: one will be short, equal to the length of the wrist, an increase for the fit and size of the beads and bracelet ties; the other two are long, which will be used to weave knots and braid beads. Next, the cords are secured to the tablet or pillow with a pin, retreating a few (7-8) centimeters to the tie, and weaving begins. The laces should be arranged like this: two long ones along the edges of the short one.
1) The knots come first, you need to make 1 or 2 of them, double flat. You need to tie a knot like this: first the left single flat knot is woven, then the right single flat knot is woven underneath it, so you get a double flat knot, so that the knots look even and neat, you need to regularly tighten the short cord that goes inside the knot, so to speak, the base. The photo shows the sequence of weaving the knot:

2) Next, you need to put one large bead on the central lace, and the two outermost long laces wrap around the bead on the sides and again weave 1.5 double flat knots, one full double flat knot and one left or right single flat knot, depending on where was the beginning of the double knot. And again the bead is put on the central cord, and also tied.
3) Work continues in this way until all the beads are woven or until the desired length of the bracelet (wrist size) is reached.
4) At the ends of the bracelet ties, one small bead is placed on any cord on each side.
In order not to have to worry about tying a bracelet every time, you can weave a braid for ties with the same double flat knots. When putting on the bracelet, the ties move apart inside this braid and then tighten again to the size of the hand.
Leather bracelets
Bracelets can be woven from thin or wide leather laces (strips); depending on their color, they can be divided into men's and women's. For example, men prefer black, brown, gray, blue leather laces, but if you add more feminine openwork elements to the weave, then women can also wear such a bracelet.
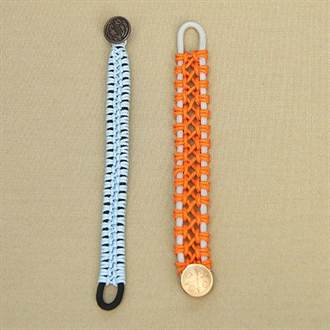
You can see a men's bracelet made of leather cords below:

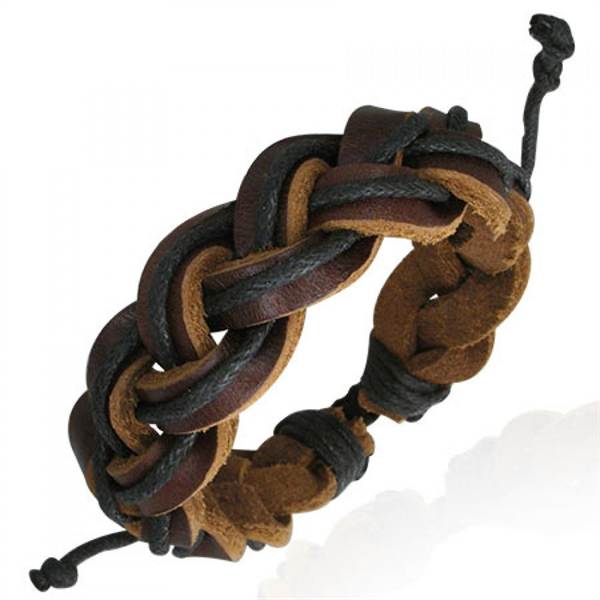


But by adding any elements or colors, you can get women's bracelets:


Lace bracelets are stylish and original jewelry that you can not only buy, but also make yourself. The uniqueness of the bracelet lies in the fact that it is woven from ordinary cords that are used for shoes.
Peculiarities
Every girl strives to update her wardrobe not only with new clothes, but also with fashionable jewelry. Not everyone can afford to purchase expensive jewelry frequently, so lace bracelets are an excellent alternative.
If desired, you can make them yourself: a stylish creative accessory will decorate and create a unique image.
A bracelet made of cords is a universal piece of jewelry, since you can choose the material, weave and color yourself. It can be feminine and elegant or colorful and bold - the choice is yours.

photos
If you follow the latest fashion trends and have a desire to create an exclusive piece of jewelry, your efforts will definitely give a worthy result. Not only young people, but also older women are interested in weaving such bracelets.
The main advantage of such unusual and fashionable jewelry is that you can purchase materials at any fabric or shoe store at an affordable price. Your imagination, availability of weaving techniques and cheap material will allow you to create stylish jewelry.

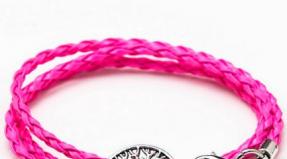
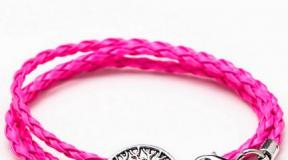
A variety of models allows you to find an attractive bracelet or create your own unique version. The highlight of the decoration can be a metal patch with patterns or inscriptions.


There can be several decorations on one hand. Braided cord bracelets can be decorated with ribbons, decorative stones, metal chains or beaded inserts.

The length of the lace will allow you to create not only a single model, but also double or triple options. A massive product will become a bright note of a fashionable look. To embody a rebellious look, a bracelet made of leather laces would be an excellent choice.
Models
Today there is a large assortment of stylish and unusual models on sale. Simple bracelets can be made not only from one cord, but also from several. They are often decorated with beads, nuts and pendants. The presence of decor adds charm, charm and romanticism to the products.

The model with beads looks beautiful and bright. You can use beads of different colors or the same color. This decoration is ideal for implementing a stylish look in an everyday style.


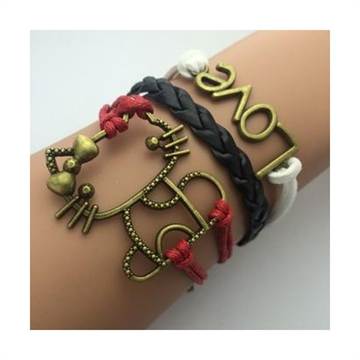
It is impossible to ignore bracelets with pendants. They look original and unusual. A wide variety of pendants allows you to choose elements for any theme. Decorations in a nautical style, such as pendants in the shape of an anchor or a steering wheel, look impressive.
Many girls choose a metal pendant with an infinity sign or an inscription, for example, “love”. Original pendants will help you create an unforgettable bracelet.

To create a strong and unusual model, it is enough to stock up not only with laces, but also with nuts. This decoration looks bright, massive and fashionable. A bracelet with nuts will add audacity and rebellion to your look.


Beginners in crafting can create a fashionable bracelet from a single cord. The weaving process does not require special skills or craftsmanship. Just take one lace and start weaving according to the pattern.

Professionals in weaving jewelry can use two cords at once. They can be presented in one or in different colors. A model of two laces will highlight the originality of the chosen ornament or pattern.

Bracelets made from flat cords are thin. An exquisite piece of jewelry can be worn to a special event or party.
You can learn how to make an interesting cord bracelet yourself from the following video:
Types of cords
You can use different types of laces to create stylish bracelets.
Craftswomen most often use:
- Waxed cord is available in different colors, which allows you to choose the desired color. It is durable because it is made of cotton braided cord impregnated with wax. The waxed cord bracelet is practical and dense.
- The bracelet can be made from suede cord, which has a beautiful velvet surface and is durable and practical. Manufacturers offer a wide range of colors. You can find both classic colors and bright and rich shades.
- Nylon cord also makes great jewelry. Such cords are perfect for woven bracelets, since their ends are very easily singed.


Cord Knots
Today there is a wide variety of bracelet weaving techniques. Craftswomen use different types of knots to create original and spectacular products.
Classic types of braiding include: four-cord braid, single and double puzzle, maiden braid and circular braid.


Even new weaving techniques are based on classic knots. Each needlewoman chooses a type of weaving that is convenient for her.

The bracelet made using the Turkish head knot looks impressive. It is woven around a cylinder that must fit the size of your wrist.


To complete the bracelet, you need to make a strong knot.
There are several types:
- Surgical - first you need to make one so-called “half-knot”. To create it, you should hold one end of the cord with one hand, and draw the other end around the first. Then create another half-knot. To secure, the lace is wrapped twice in the first half-knot, and once in the second. After this, the ends of the cord should be cut, leaving no more than one and a half centimeters.
- The usual way is to insert one end of the lace into the loop on the other side, then move the knot away from the loop and tie the ends together. But this option is impractical.
- Sliding is one of the most difficult options because it requires time and patience. It can be used to secure cotton cord.
Unusual handmade jewelry - a creative approach to choosing accessories. Creating a cute little thing, such as a bracelet from laces, for example, is not as difficult even for beginners as it might seem at first glance. It is enough to allocate only 30 minutes from the schedule, and the original bracelet will be ready.
Handmade, or, more simply put, handmade, requires precise and specific instructions. This master class is simple and clear. With its help you will understand exactly how to make this cute bracelet.
DIY bracelet made from laces: master class
To tie the bracelet you will need silk cords. If such wealth is not at hand, then any other soft fabric will do. First of all, the main thing here is flight of fancy.
So, the necessary materials
- Plastic or metal hoop - it will serve as the basis for the future bracelet;
- Cords (preferably silk) – they will be used as decoration for the bracelet (3 pieces).
The length of the rag cords for the bracelet depends on the diameter of the selected ring.
Let's get started: create a stylish bracelet
 1 step.
3 silk cords of different colors are threaded through the ring and folded in half. It is worth making sure that both sides of the cord are equal in length at both ends.
1 step.
3 silk cords of different colors are threaded through the ring and folded in half. It is worth making sure that both sides of the cord are equal in length at both ends.
 Step 2.
Next, we place each lace identical to the image. Schematically, the cords are woven into a “pigtail”.
Step 2.
Next, we place each lace identical to the image. Schematically, the cords are woven into a “pigtail”.
 Step 3.
As soon as you figure out which lace and where to place it, you can start weaving a silk braid around our future miracle - a bracelet made of laces. The first link of the “braid” is made around the metal base of the ring. Don't forget to look at the photos attached to the instructions.
Step 3.
As soon as you figure out which lace and where to place it, you can start weaving a silk braid around our future miracle - a bracelet made of laces. The first link of the “braid” is made around the metal base of the ring. Don't forget to look at the photos attached to the instructions.
 Step 4
The basis for further weaving a bracelet with your own hands is ready and now you can get down to business. You need to braid the ring as follows:
Step 4
The basis for further weaving a bracelet with your own hands is ready and now you can get down to business. You need to braid the ring as follows:
- two silk strands are located, as it were, on the outside of the bracelet;
- the third strand of fabric goes around the ring through the center, that is, the third part of the braid from the outer part passes through the center of the bracelet and only then is added to the weave.
This is how simple weaving should look like.
Step 5 Nothing new will be added in terms of the technique of weaving a bracelet from laces during the work process. Similar to point No. 4, the “braid” is woven in a circle. You should get exactly the same as shown in the photo. The only difference is the color palette of the product, as well as the thickness of the braid, because the structure of the fabric may be different from silk.
Step 6 Weaving a silk “braid” ends at the moment when the entire diameter of the bracelet ring is covered with fabric. At the end of the braiding of the bracelet, any one strand is selected from three rag tracks and tied into a knot.
Important point: Not only the selected strand is tied into a knot, but also all other threads.
The technology will seem familiar to you - one lace goes around all the others, thus collecting them together. Only after this manipulation has been completed will it be possible to tie a knot. Look for a diagram for beginners in the image attached to the master class, so you can’t go wrong in creating a stylish bracelet from laces.
Step 7 Tighten the knot tightly so that your bracelet does not unravel later. It is likely that you will have too much fabric left at the end of the job. Leave exactly as much as you think is necessary and beautiful for the fringe, and calmly cut off the rest with scissors.
 Step 8
In fact, at this point, braiding a bracelet with your own hands can be considered complete, but in fact, many craftswomen do not stop at this stage. The finished bracelet is decorated with rings, various accessories, beads, sequins and even flowers. It all depends here only from your imagination and preferences.
Step 8
In fact, at this point, braiding a bracelet with your own hands can be considered complete, but in fact, many craftswomen do not stop at this stage. The finished bracelet is decorated with rings, various accessories, beads, sequins and even flowers. It all depends here only from your imagination and preferences.
Delicate and perfect to complement this beautiful DIY lace bracelet.
For beginners we provided photos and diagrams:
(Photos are clickable)