Teddy bear made from pine cones (crafts made from natural materials). Craft for children's creativity - do-it-yourself bear made from pine cones Crafts from pine cones - a mouse and a bear
If the weather is good on the weekend, we play in the yard almost all day. Around the playground, a certain smart person planted a dozen chestnuts, walnuts, maples and rowan trees. A little further on grow wild grapes, mulberries and apricots.
It must be said that in autumn, colorful trees present an incredibly colorful sight. It's a pity that there are no artists in our family. Rich colors, accompanied by sunny weather, greatly lift your spirits and inspire creativity.
After playing outdoors, my daughter and I go to make crafts from natural materials collected in the yard. From last season we still have cones of Crimean and common pine, as well as fairly dried chestnut peels. Precisely, today we will make a wild animal out of them - a brown bear. Join us!
To work you will need:
- - Crimean pine cone,
- - plasticine,
- - quartered chestnut peels,
- - autumn leaves for decorating crafts.

First, we will distribute responsibilities with the child. The daughter sculpts plasticine parts, and the mother corrects possible defects. We will need two round flat ears, eyes, an oval brown muzzle with a black button nose.
The craftsmen completed the difficult task with excellent marks, but the mother will have to attach the finished elements to the bump herself. Jewelry work cannot be rushed; you need to firmly press the plasticine parts to the scales so that they do not lose their shape.

We set the body and head of the craft aside and take up the thorny paws of the beast. Last year's chestnut peel quarters are an ideal material for decorating the limbs of all shaggy animals. If necessary, parts are reduced in size, and sharp corners are cut off with scissors.

We will attach the paws to the body of the craft using pieces of plasticine. The bear must stand firmly on its feet and not tip over.

Here he is, a forest predator, raising his paw in greeting. Now the beast will roar throughout the impenetrable thicket.

Beautiful handmade crafts from pine cones are often found at children's competitions and exhibitions. This natural material is accessible, convenient and safe to work with. The main thing is to have time to collect it on time and prepare it correctly.
Forest dweller made of pine cones


Topiary made of acorns and cones
Which cones are suitable for children's crafts?
To make crafts from pine cones for school or kindergarten, you need to know the following rules:
- Cones that have not yet opened should be collected - they take up less space;
- if it is necessary for the lump to open, they simply do not cover it with anything;
- If you plan to make a craft from an unopened cone, immediately after collecting it you need to dip it in the adhesive composition.

Original topiary
The safest way to cover pine cones for crafts is with wood glue, which has been previously diluted with water to a liquid consistency. You need to take the workpiece with tongs and dip it into the adhesive solution several times. Then put it on oilcloth. Periodically the cone must be turned over. It will take about three days to dry.

Composition of pine cones
How to make a large craft pine cone flexible
The natural shape of a cone is not always suitable for creating a specific composition. So, it happens that you need curved material. To soften the surface of the workpiece and give it a specific shape, you need to put the cone in boiling water and cook for about 5-10 minutes. After cooling slightly, “roll” it to the side with your hands and secure with a rope or adhesive tape.

Wreath of small pine cones
What crafts can be made from pine cones?
Children's crafts made from pine cones can be different. Funny figures of animals and people, decorative elements for the home, compositions and paintings - this material gives freedom to creativity. On the eve of the New Year holidays, you can make Christmas tree decorations from them.

Beautiful wreath

New Year's decor

Wreath decorated with balls

DIY gift from pine cones
Craft from pine cones for elementary school - hedgehog
If a child is tasked with making a beautiful craft from pine cones with his own hands, parents definitely need to tell him in which direction to move. It’s quite easy to make a hedgehog like this:

Hedgehog from a cone
You need to take a cone and plasticine. Form a muzzle out of the latter and attach it to the back side of the wooden base. It is better to make the eyes and nose from plasticine of a darker color so that they stand out well against the general background.
Hedgehog needles should be decorated with grass and leaves. You can make mushrooms and carefully attach them on top.

Funny hedgehog with sharp needles
A craft that involves several pine cones looks interesting:


Big hedgehog
Christmas tree made of pine cones for an exhibition
To make a Christmas tree from pine cones, you need to prepare:
- cardboard;
- acrylic paint;
- glue gun;
- cones;
- decorations for a homemade forest beauty.

DIY tree made from pine cones
You need to make a cone out of cardboard, and then cover it with open cones using hot glue. It is advisable to decorate the top of the Christmas tree with some flowers, beads, sparkles, and ribbons to make it look more elegant. If you want to change the color of your homemade Christmas tree, you need to spray paint on it from a can before decorating.

Another way of making a forest beauty from pine cones is also possible. The materials you will need are the same, but the order of work will be slightly different. Here you don’t have to make a base in the form of a cone - you just need to cut a circle out of cardboard and start designing it as follows:

Making a Christmas tree from cardboard and pine cones
Bear made of cones
A beautiful bear can be easily made from pine cones.

Its body must be formed from the longest piece, its paws from four small cones, its nose from peppercorns, its ears from acorn caps. If one of the natural materials necessary to design a forest dweller is not at home, it should be replaced. So, ears, nose and eyes can be made from plasticine, croton, colored dough.

Bear made from different cones
It would be great if cedar, pine and spruce cones are combined in one composition. Then it will look more interesting and neat.

Huge bear made of pine cones

Small bear
What other crafts can be made from pine cones?
You definitely need to experiment with pine cones. Since they are so easy to connect to each other, you can create shapes of many different shapes.
A bunny like this is made very quickly:

Pine cone hare
To make it you will need:
- one open bump;
- multi-colored plasticine;
- toothpicks (can be replaced with spruce needles).
The forest squirrel also looks unusual:

DIY squirrel
To complete the owl you will need only two cones:

Owl made of cones
If a child asks to make penguins for an exhibition at school or kindergarten, parents should not be afraid of such a task.

Penguins made from pine cones
Watercolor paint coated with varnish will help make the body of animals white.
Baskets of cones
A basket of pine cones can be made for an exhibition in a garden or school, or for decorating the interior of an apartment. To make it you will need flexible wire. You need to alternately connect the cones to each other, and then form rows of them.

Making a basket

Decorative basket

Small basket

Large container of pine cones
You can decorate the basket with flowers, acorns, and dry grass.

Decorating a basket of pine cones
Fir and pine cones are an excellent material for creating crafts and decorations in the home. Natural raw materials from the forest not only look original, but also have a pleasant pine aroma. Handmade products will become an original decoration for the New Year holidays.
When collecting, it is better to give preference to clean material without dried resin and insects. Remaining dirt can be easily removed with a cotton swab dipped in an alcohol solution.
The internal cavity of forest coniferous raw materials is cleaned by soaking it in vinegar essence diluted with boiled water in a 1:1 ratio. After processing, the scales may close, but their shape will remain original.
To create crafts from closed cones, it is recommended to collect material in the autumn and in sunny weather. This is due to the fact that the harvesting material will be well cleaned and dried. October is the best period, when the raw material is moist and the covering scales are tightly closed. Here you can also find cones of non-standard shape.
Tools for work
In addition to forest raw materials, to perform artistic work you will need auxiliary tools, The most commonly used ones are:
- scissors– must have blunt ends for the safety of children;
- awl or a large needle - a tool made of durable material is welcome, always with a thread passed through the eye;
- simple pencil– needed for line or contour drawings;
- paints– necessary for the design of the intended toy or decor, preferably gouache;
- tassels– softer for painting products, harder – for glue;
- stack– intended for shaping the surface of clay or plasticine in creativity;
- tongs or pliers– used for screwing in wires and hooks;
- clear varnish– gives the finished product strength and smoothness.
Accessories that are hazardous to children should only be used under adult supervision or assistance.
It is important that the teacher or parent knows the features of working with devices and, as necessary, acquaints the child with them.
In the process of needlework, several methods are used to attach elements to each other:
- Plasticine- the most accessible and easiest way for children to connect parts. In order for it to be inconspicuous on finished products, you will need to choose a color similar to the material being fastened. In addition, using plasticine it is convenient to “revive” animals by blinding them with eyes, nose and paws.
- Transparent glue “Moment”– a durable option for connecting elements when working with cones. Glue is applied to the parts to be fastened and pressed tightly against each other for a few seconds. This stage of work is recommended to be performed by adults so that the child does not inhale glue fumes.
 Crafts made from pine cones are best held together with Moment glue.
 - Thin wire- will be needed when making certain types of crafts - baskets of pine cones, New Year's wreath.
Toothpicks are used less often. The material coated with glue can serve as a fastener for the body and head.
Processing pine cones for crafts
When you need open cones during creativity, you should dry them well. Natural preparations can also be collected in the spring after being freed from seeds. It is important to note that open copies do not change their shape.
If it is necessary to use an unopened type of cones in your work, then after cleaning the scales, they are treated with glue. You can use regular PVA glue or wood glue.
Less often, curved shaped raw materials are needed for crafts. To obtain the desired workpiece, it is left in boiling water until it becomes elastic, and then the desired appearance is formed, secured with insulating tape.
The material intended for making figures must be clean and dry. Cones that have been pre-treated should be thoroughly dried.

There are 4 drying methods:
- Outdoors– choose a dry, well-ventilated place, cover the surface with paper and leave for 2-3 weeks.
- In a frying pan– put the raw materials into a cast-iron bowl, leave on low heat and, periodically turning over, bring to readiness.
- In the oven– Place foil or parchment paper on a baking sheet, distribute the buds not too tightly to each other and keep for 30 minutes at a temperature above 200ºC.
- Microwave– cover the glass surface with napkins, lay out the workpieces and put the electrical appliance on maximum power for 1 minute.
Pine cones take longer to dry than spruce cones. In addition, due to the lightness and volatility of the seeds, it is better to prepare them in a large and tall box.
Poorly processed elements can become deformed over time. Fir cones are especially susceptible to external changes.
To ensure that the creative result remains in perfect shape, the following recommendations must be followed:
- Boil the assembled pieces for 30-40 minutes;
- remove accumulated moisture by drying;
- carefully treat the finished material with wood glue;
- If you need to obtain light buds, you should soak the raw material in a container with universal bleach.
Natural raw materials after heat treatment will become clean and safe. DIY crafts made from cones can be covered with paint of the desired color, varnish or artificial snow. The choice will depend on the intended decoration.
In some cases, when performing artistic work, it becomes necessary to drill or cut material. With this impact, the scales of cones, especially those of spruce trees, break and crumble. To keep them intact, you need to use the tip of the drill to hit the center of the workpiece as accurately as possible and, without using any effort, deepen it with rotations. The resulting hole is covered with glue.
The principle of processing and creative work with spruce and pine cones is identical. The only difference is that crafts made from spruce material will have an elongated shape.
What other materials can be used
In addition to pine cones, there are also a lot of natural materials that can be combined with pine cones - bright leaves, chestnuts, pebbles of various shapes, acorns are excellent means at hand for children's and adult skills. Combining raw materials of various shapes and textures will allow you to create artistic work of any size.

In art Cereals, nuts, matches, threads are also successfully used or other handicraft items. Additional elements will make the work more realistic and creative, breathing life into animal figures. Experts assure that the combination of artificial and natural parts is welcome in any craft.
Craft ideas for kindergarten
Crafts made from pine cones are a good solution for decorating the interior on the eve of the New Year holidays. From the available components, you can make something new and interesting with your own hands at any time. Creating original crafts is an activity for the whole family.
Christmas tree
A DIY Christmas tree is the main creation before the New Year.

To make a figure you need:
- cones of various sizes;
- glue gun;
- spray paint;
- cardboard;
- scissors.
At the first stage of mastery, you should form a cone with a base from cardboard. Spray paint on thoroughly cleaned and dried pine cones. If desired, the raw materials can be left in their natural form.
Next, you should select the largest cones and, using a glue gun, starting from the base, glue the lower part of the cone in a circle. Moving to the top, the material is used in ever smaller sizes. As a result, small-sized elements remain for the peak of the cone.
The process of making a Christmas tree is completed by decorating it with sparkles, beads, and ribbons. When decorating, it is important to choose the color scheme tastefully.
Bear
DIY crafts from pine cones can be made in any size: as a tabletop souvenir or garden figure. They will engage children in creativity, developing perseverance, diligence and imagination. Even a child can handle the proposed bear design option.


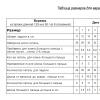
Materials for creativity must be prepared in advance (Table 1).
Table 1
| No. | Number of cones | Purpose |
| 1 | 1 piece big | Torso |
| 2 | 1 piece smaller size | Head |
| 3 | 4 pcs. average | Paws |
| 4 | 2 pcs. little ones | Ears |
All elements must be assembled, securing them together with glue or wire. You need to sculpt the eyes and nose from plasticine. The pine cone bear is ready. You can decorate your new product with a bright ribbon bow.
Candlestick made of pine cones
A small project for a New Year's candlestick attracts with its simplicity and originality. A preschool child can handle this original idea.
To create it you will need a minimum set of raw materials and tools:
- wax candle – it is recommended to take a wide one;
- small cones;
- cardboard or durable paper;
- glue.


The prepared candle must be wrapped in cardboard and secured. The paper should hold well and fit snugly against the walls of the candle. Next, the base of each cone is coated with glue and attached to the workpiece.
To add brightness to the candlestick, the materials are pre-painted or sprayed with glitter. Candlesticks can be whipped up in advance or on New Year's Eve.
Hedgehog
Using the gifts of nature and decorative elements, you can create exciting children's toys. Acorns, chestnuts, leaves, as well as artificial elements are used to make them.
 Creativity begins with the preparation of the necessary components. In this work you will need opened pine cones and plasticine: black and white.
Decorative elements and colored plasticine are used to decorate the hedgehog.
Step-by-step execution of the figure:
- From a small piece of white plasticine you need to form the animal’s muzzle and attach the blank to the flat part of the pine cone.
- Next, you should revive the toy by making ears, and from black plasticine - eyes, nose and paws.
- Taking multi-colored plasticine, you need to sculpt mushrooms and apples. Fruits are pinned on the hedgehog's back.
DIY crafts made from pine cones can be considered a fun toy for a child or a nice souvenir for loved ones.
New Year's wreath
A New Year's wreath is the most beautiful decoration made from fir cones.
Making the decor, if you follow the step-by-step instructions, will not take much time:
- Newspapers must be rolled into a ring, rewound with wire - this will be the basis of the product.
- Wrap a beautiful fabric (organza) around the resulting ring and secure the ends with a glue gun.
- Fir cones are attached to the frame along the entire perimeter.
- The resulting wreath can be decorated with rain, beads or ribbons.

Spruce blanks can be prepared in advance by decorating them in gold or silver. While maintaining a natural look, the material is supplemented with green branches with red ribbons. Spruce decor looks more impressive if sprinkled with sparkles.
To simplify the process of creating a New Year's wreath, you need to take a ready-made base as its basis. The individual item can be purchased at any craft store.
In this case, creativity begins directly with attaching the processed cones and decorating the product. You can diversify your creativity by adding materials such as chestnuts, acorns or nuts.
Garland
Making the garland begins after preparing the cones. Large and open blanks are best suited for creation. The materials, cleaned of dirt and painted with the required paint, must be strung on a tape, maintaining the same distance between the elements.
Step by step instructions:
- First you need to measure the distance in the room where the garland will be placed.
- Next, cut the tape according to the measurements, leaving a small margin for sagging.
- Lay out the cones and mark their location on the tape.
- Holes are made in the marked places, and loops are sewn at the ends of the tape for hanging.
Now you can start processing. It is necessary to carefully break off the top row of scales and coat the treated area with glue. Next, screws with hooks are screwed into the center of the workpiece using pliers. Finished products are hung on a ribbon, combining color, shape and size.
You can create crafts in the evenings with your family. Original figures and decorative items made from pine cones are a reason to bring out your child’s creative abilities and make New Year’s gifts with your own hands.
Article format: Natalie Podolskaya
Video about creating fakes from pine cones with your own hands
Crafts from pine cones - the best ideas in this video:
Here are some very interesting and simple crafts from pine cones that you can make yourself or with your children:
Pine Cone Crafts: Large Round Ornament
You will need:
White foam ball
Cones (natural or artificial)
Thin wire (if using natural buds)
Pin
Scissors.
1. You need to glue the pine cones to the foam ball.
If you use artificial cones, they will have a tail at the bottom, onto which you should apply glue and insert the cone into the foam ball.
If you use real cones, then it is better to attach a wire to them from below, twist it in a spiral, apply glue and insert it into the ball.
*It’s okay if the ball peeks out from under the cones - it is white, which means it will look like snow.
*Leave some room for ribbon, which you can then attach to hang the decoration.
2. To hang your ornament, attach ribbon to it. This can be done with a pin or glue.
3. You can cover the place where the tape is attached with new cones.
* You can create several of these balls to decorate a large room.
Christmas tree made of pine cones

You will need:
Lots of bumps
Glue (hot glue or super glue)
Decorations to taste
Glossy spray paint (optional)
Cardboard or foam cone

*You can buy a foam cone at a craft store, office supply store, or flower shop.
* You can make a paper cone (preferably from cardboard) with your own hands. Visit our article "Paper cone" to find out how.
1. Start carefully gluing the cones to the cone so that they cover it as much as possible.

The pine cones can be attached to the foam cone using wire, like this:


2. Once you have glued all the pine cones, you can apply glossy spray paint to secure the structure. Leave it overnight to dry everything.

3. It's time to decorate. You can glue natural or artificial spruce branches. You can also add plastic balls, thin tinsel, candies and much more.

*Use a brush to get rid of any thin streaks of glue that may remain after the pine cones are glued on.
Crafts from pine cones for children: snowman

You will need:
Match or skewer
Scissors
Small sock
Toy eyes, plasticine or colored paper.
1. Using a match or skewer, insert cotton wool between the scales of the cone.
2. Using scissors, cut a small part of the small sock and place this part on your snowman's head. You can tie the cap on top with a thread, and cut the tip of the cap with fringe.
3. Cut out mittens and a nose from felt and glue them to the pine cone along with toy eyes.
* If you don't have toy eyes, use plasticine or colored paper.
Children's crafts from pine cones: gnome

You will need:
Small bumps
Wooden beads (in this example, their diameter is 2.5 cm) with a large hole
Scissors
Thread and needle
Felt pen.

1. Make a hat out of felt. In this example, the hat is about 6 cm high, but you can choose any hat height for your gnome.
From felt, cut out a triangle with a rounded base (see image). Fold the triangle to form a cone.
Use a thread and a needle to connect the ends to form a hat.

2. Cut out mittens from felt and glue them to the pine cone. In this example, felt mittens are glued to a thin pipe cleaner that goes around the pine cone.
3. Cut out the legs from felt - they are heart-shaped - and glue them to the base of the cone.
* If your gnome doesn't stand well, try attaching plasticine to the base or even replacing the felt legs with plasticine ones.
4. Glue a wooden bead to the top of your pine cone, and glue the gnome's hat to the bead.

5. You can draw eyes and a smile on the bead with a felt-tip pen.


In a similar way you can make the following gnomes:

DIY children's crafts from pine cones: Santa Claus

You will need:
Small bumps
Polymer clay (you can use colored clay if you don't want to paint with regular white clay)
Brush
PVA glue
Superglue
Acrylic paint (in this example with glitter)
Toy hat (you can make it yourself from the same polymer clay)
Thin wire
Artificial snow (optional).

1. Make a Santa Claus hat from polymer clay.
Make a ball out of clay.
Make a cone from the ball, which will become a hat. The top of his head can be slightly bent.
2. Place the hat on the top of the pine cone.

3. Make 4 small balls of clay - one large, two medium and one small. From them make a beard (large ball), mustache (medium balls) and nose (small ball).
4. Carefully attach all the parts to the cone, lightly pressing the clay against its scales.
* To make your beard and mustache more realistic, you can brush over them, thereby creating uneven lines.
5. Take a small piece of wire and thread it through the hat, twist it and leave a small loop.
6. Place your workpiece in the oven for 15 minutes at 135 degrees. When you take it out of the oven, Santa Claus's mustache and beard may fall off and you will have to glue them on.
7. Tie a ribbon to the wire.
8. You can use artificial snow to decorate your hat. You can also decorate the hat with glitter or simply write the year on it with a marker.
9. You can use acrylic paint to paint the nose (red color) and beard (white color).
Natural crafts from pine cones: feeder

You will need:
Bird food
A small baking tray and any other container where you can pour food
Peanut butter
Peanut butter container
A small knife (toy or blunt).
1. Pour bird food into a container.
2. Prepare the peanut butter and use a knife to apply it to the pine cone. Leave the crown of the pine cone intact.

3. Place the pine cone in a container with food and dip it well so that it is completely covered.

4. Tie a ribbon to the top of the cone and you can hang your feeder on the tree.

Owl made of pine cones

You will need:
Buttons, construction paper or toy eyes (to make owl eyes)
Scissors
Glue (hot or superglue); You can try PVA glue if you are making this craft with children.

1. Take the pine cone, wash it and dry it.
2. Glue eyes to the pine cone. They can be cut out of paper or cardboard, made from polymer clay or plasticine, or simply buy plastic toy eyes.
* You can use buttons or plasticine for the pupils, and felt circles for the eyes.

3. Cut out the owl's beak, legs and wings from felt and glue them on as shown in the image.
Here's another example of an owl:


DIY pine cone decorations for the home

You will need:
Aerosol paint

* When using spray paint, choose a well-ventilated area, and it is best to paint outside. It is also advisable to use a mask and safety glasses for protection, as spray paint contains chemicals that are harmful to health.
You will need to paint each pine cone in two coats. After the first coat, let the paint dry and only then apply the second coat.

Crafts from pine cones: how to make a garland

You will need:
Lots of bumps
Strong thread (fishing line or twine)
Scissors.


1. Wash and dry your buds to remove any unnecessary debris.
* If desired, you can put the cones on a baking sheet and put them in the oven to dry for 1 hour at 90 degrees. This will kill any wildlife that may be hiding in the pine cones.


2. Prepare some twine or other strong thread and start wrapping it around the base of the pine cones and tying a knot. Make one loop at each end of the rope so that the garland can be hung.
3. Cut off the excess rope and your garland is ready to hang.


* If desired, you can paint the cones with acrylic or aerosol paints (only in fresh air and with a protective mask).
* You can also tie artificial berries and autumn leaves along with the pine cones.
What can be made from pine cones: turkey

You will need:
Washi tape (Washi Tape) of several types (or colored tape)
Hot glue or superglue
Scissors
Stationery knife
Ice cream sticks
Yellow and red felt
Toy eyes or plasticine to make eyes.

1. Using a utility knife, cut several popsicle sticks in half.

2. Apply washi tape to each half of the stick. To trim off excess parts, use a utility knife or scissors.


3. To make the beak and the fleshy appendage that hangs at the base of the turkey's beak, cut out a triangle and an oval or pear-shaped shape from felt.

4. Glue all parts of the face to the pine cone, including the toy eyes. If you are using playdough, stick it where you want the turkey's eyes to be.
5. Glue sticks decorated with washi tape to the bottom of the pine cone.

Roses from pine cones (master class)

You will need:
Twigs
Colored, scrap paper, felt or corrugated paper
Tassels
Scissors
1. Use a brush to remove debris and seeds from the pine cones.
2. Use large, long-bristled brushes to paint the pine cones in different rose colors (red, yellow, burgundy).

3. Prepare straight branches, trim them to the desired length and paint them green.

4. For each rose you need 2 leaves. Cut out leaves from green paper or felt.
5. We collect all the details. First glue the pine cones to the branches, and then glue the leaves.


All that remains is to put all the flowers in the vase and the decoration is ready!
Crafts from fir cones: fairy

You will need:
Wooden bead
Paints and whale
Felt (in this example red and pink)
Scissors
Glue (hot glue or superglue).
If your child doesn’t know what to do, show him this master class. A small but beautiful bear made of pine cones will definitely arouse interest.
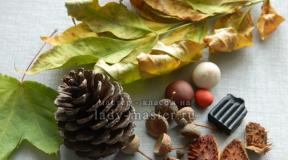
The craft is based on pine and cypress cones, walnuts and plasticine, with which some elements are sculpted. Such creativity develops imagination - kids learn to see new figures and images in the gifts of nature. Already while walking in the park or on the way from home, the child will learn to determine what a natural find can be turned into.
Preparation of materials
To make a bear you will need:
- an open pine cone;
- walnut;
- colored plasticine;
- toothpick;
- scissors;
- stack;
- wet wipe;
- brush with hard bristles.
If there are no pine cones, sculpt the parts from plasticine. As a last resort, the muzzle can also be made of walnut. Use your imagination.
Collect more natural materials, they will be useful for creating or. It contains all the lessons on crafts made from natural materials for children and adults. And ideas of what you can make with your own hands from pine cones.
Technique for making a bear cub
Take a round open cypress cone, remove debris and dust with a brush or damp cloth.

Wipe large walnuts to remove dirt.

Use scissors (nippers) to cut two large scales from the opened pine cone.

Insert the scales into the “slots” and add brown plasticine circles to the center of the resulting ears.

Do expressive eyes: make light flat circles, stick blue circles and black pupils on top. Add white highlights to the corners of your eyes. Create eyes on the bear's face.

Roll up a black nose and stick it to the bear's face. Make the nostrils a round stack, and mark a shallow groove in the center.

Place it in the bear's mouth two sharp teeth made from white plasticine. Make a pink tongue of the appropriate size and insert it into one side of the mouth.

Make the body of a bear. Mold the paws from brown plasticine, using a stack or a toothpick to highlight the claws. Connect the limbs to the body as in the picture.

Stick a brown piece under the head and connect the main parts together.

Make a bright pot and fill it with a sweet treat. On the pot, highlight the word “ HONEY"Using a stick or toothpick. Stick a yellow piece onto your sweet tooth’s paw and smear the edges.

Potap the bear made from natural materials and plasticine is ready!

Such a friend will decorate a shelf or become the hero of a home puppet theater. And if you get a little creative, the bear will be quite suitable for decorating a New Year tree.
Show your child other lessons on our website. Path or make. We also recommend that you get acquainted with our selection of games and interesting activities for children at home.