Manicure with sculpting. Sculpting on nails with gel: features of manicure Drawing from acrylic sculpting on nails
The versatility of nail design knows no bounds, and one of the most popular today is nail sculpting. It is this that allows you to create amazing three-dimensional drawings. Decorative modeling in manicure allows you to make the image more interesting and, of course, will not leave your hands unnoticed by those around you.
It would be incorrect to say that nail sculpting is the design of an everyday, everyday manicure. It would probably be more appropriate for holiday parties. Nail sculpting looks amazing both in reality and in memorable ones, such as wedding photographs.

You can learn everything, but for the first time it would be better to visit a salon. The master will not only do the job efficiently, but will also be able to help with advice that will be useful for further independent activities.
Nail sculpting is a process of creating amazingly beautiful three-dimensional figures - it is unusual, stylish and impressive. The materials used in the work are acrylic and gel.

But, unfortunately, modeling is quite impractical for everyday use. Volumetric figures can catch clothes, which causes some inconvenience.
To make the composition smoother and adapt it to an everyday look, after finishing the sculpting, the figure is covered with a dense layer of transparent gel. The so-called “aquarium” effect is created.

Are there any differences in applying sculpting using gel compared to figures made from acrylic? The end result will not be much different; the differences are visible only in the application technology and the features of the compositions used.

Initially, the gel was not used to create sculpting. This was due to its rather liquid structure. But today there is a special gel with a 3-D effect, which is successfully used in modeling.

Its use has made it possible to diversify nail designs. Modeling has become more convenient, the plastic structure of the gel allows you to create amazing and unusual figures. It should also be noted that the gel, unlike acrylic, is completely odorless. This nuance was appreciated by professional craftsmen.
The gel sculpting technology involves applying a ready-made, formed figure to the prepared nail. Each element of the composition necessarily undergoes a polymerization process using a UV lamp. If this process is not completed, then in the future it is possible to mix color accents in one figure.
For those who want to independently master the art of this decorative nail art, you should first master sculpting using acrylic. It is more flexible and easy to use.

Only after the acrylic sculpting technique has been mastered perfectly can you move on to studying the gel sculpting technology.
With desire, patience and great faith in one’s own abilities, everyone can master the amazing art of decorative nail sculpting. Volumetric design is very beautiful. Man-made flowers and other patterns look real.
Master class - how to make gel modeling
You should not think that the art of decorative modeling is only within the power of professional craftsmen. A sufficient amount of free time, patience, accuracy and a very great desire will help you master this easily and quickly.

You must always remember that not everything will work out the first time. Only daily work and experience can lead to the desired result. Even eminent masters did not immediately comprehend the unusual science of decorative nail art.
As a rule, volumetric figures made of gel or acrylic are fixed on long nails. You should not attach the composition over the entire surface of the nail plate. In the cuticle area, decorative molding is held quite fragile.

It’s also not very nice to cover all your nails with volumetric sculpting at once. Sculpting on the nails of some fingers, such as the index finger or thumb, will look much more beautiful. The nails on the other fingers should be coated with varnish, the color of which will be in harmony with the volumetric composition.
Modeling can be applied not only to extended nails, but also to natural nails. At the same time, you need to know that when attaching three-dimensional figures to a natural nail plate, it must be coated with varnish before starting work.
The most difficult, but extremely interesting, will be the actual production of the composition from acrylic or gel. The flight of fancy is unlimited, but the most popular three-dimensional figures are flowers: roses, orchids, daisies.
Everything will definitely work out if you adhere to the simple requirements of the technological process:
- performing the modeling itself - using a brush to form the material that has not yet hardened, thereby creating the intended image;
- thoroughness and accuracy in work are the key to a successful result. Even the smallest details must be carefully worked out;
- When choosing colors, it is better to limit yourself to two or three shades. Then the composition will turn out stylish and not tasteless.
The ideal placement of the composition on the nail is a guarantee of successful work. Acrylic sculpting works best on the highest point of the nail. Places on the tip and cuticle area should be avoided, as it is impossible to secure the volumetric composition well there.

After the composition is fixed on the nail, it must be covered with a thin acrylic layer. This will protect the drawing from mechanical damage. The cuticle should be treated with oil. The final stage of decorative nail art is treating the nail with a nail file in order to give it an ideal shape.
There is another known, fairly simple method of applying acrylic sculpting to nails.
The technology for this type of manicure is different in that all three-dimensional figures are initially made on foil or glossy paper.
The finished figure is transferred with a brush to the nail and secured with glue. Remember that excesses can only do harm and make your manicure look tacky. Professionals advise decorating no more than two nails on one hand.

How to choose the right materials for the job
It is not enough just to study the technology of applying sculpting; it is important to know which materials are most suitable for the job. The base is colored acrylic powder and acrylic liquid. By mixing these two ingredients you can obtain a plastic material of the desired consistency.
When choosing acrylic powder, pay special attention to its high quality. Only such a component will make it possible to create a plastic and easy-to-work material that, after hardening, will not crumble and can be easily sawed off.

Monomer or acrylic liquid is needed as a binding component to create the modeling mass. Manufacturers offer several types of acrylic liquid:
- based on ethyl methacrylate. It is absolutely odorless and allows you to create a self-hardening mass. Ideal for creating particularly subtle and elegant compositions;
- based on methyl methacrylic. A substance with a not very pleasant odor. It hardens quite slowly, so it is most suitable for nail extensions. Despite its pungent odor and detrimental effect on human health, the craftsmen did not completely abandon its use. The reason for this is the very low cost.
A sculpting brush is the main tool for decorative nail art. The variety of shapes and sizes can be a little confusing. But the master’s arsenal must include a pointed round brush and a “cat’s tongue” brush.
As you get better at it, you can purchase brushes of different sizes. So, to draw the fine details of flower petals, you may need a hair brush.

Acrylic or gel modeling is durable. To remove this beauty from your nails, just file it down. But this procedure should be carried out very carefully so as not to damage the nail plate.
Acrylic nail sculpting master class
Wedding manicure with sculpting


Competitive works with modeling


Today, acrylic nail sculpting is the most popular and relevant type of design. With the help of such non-trivial art, you can create entire compositions that will look impressive, accurately convey the creative intent of the author and complement the image. After all, every woman wants to look irresistible, especially on significant and festive occasions. Therefore, many representatives of the fair sex choose artistic decoration.
This technique of applying special material to the nail plates cannot be called easy, and not everyone can master it in a short period of time. You need to be patient and be prepared for the fact that you won’t be able to create a masterpiece the first time. Some people master this art in special courses, others get the necessary information from the Internet.


Acrylic sculpting on nails - design features
If you decide to master this technique, it is worth keeping in mind that the conceived image must first be carefully considered, and then proceed to its implementation. Moreover, sculpting acrylic nails for beginners is more difficult than for those who have already encountered a similar technique. Therefore, experienced craftsmen advise first drawing a pattern on a piece of paper with a regular pen, carefully drawing every dash and line. After all, such a manicure is noticeable immediately, so it must be done very carefully. Details play a big role here: they must be clear and have ideal contours. By the way, even experienced specialists, in order not to redo their work, first create a model of the future composition, because such creativity is a long and painstaking process that has its own difficulties.


Sculpting nails with acrylic, the photo is a clear confirmation of this, is a non-trivial way to design nail plates. All the figures seem to “rise” above the surface of the nail. Acrylic sculpting on nails is a catchy and bright NAIL ART in volumetric visualization, for which special materials are used: powder and liquid monomer (liquid). All work is done using a special brush, which applies the intended design. The whole process really resembles modeling and requires skill, since the “molded” elements freeze within 1-1.5 minutes.

When creating voluminous compositions, first extend your nails. Since its upper edge is mainly overloaded, it must be very strong. Otherwise, the composition may peel off and the natural plate itself may crack.
How to make a manicure with acrylic modeling?

For acrylic nail sculpting step by step you will need:
- Liquid (special liquid). It is better to choose a classic self-hardening one (necessarily based on ethyl methacrylate, but in no case methyl methacrylic, as it is bad for health and can cause allergies).
- various shades.
- Modeling brushes. Buy several brushes; the most convenient is considered to be round, with a sharp end. You should not neglect the small brush, it is also called a brush - “hair”. With its help, small details can be easily drawn (for example, the veins on the petals).
- Elements for decoration (rhinestones, beads, etc.).

A flawless manicure can only be achieved using high-quality materials from well-known and trusted companies. For example, high-quality acrylic never turns yellow or crystallizes.

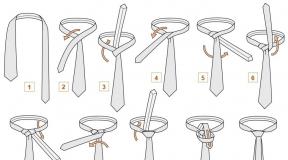
Technique:
- Acrylic comes in bubbles, so the required amount needs to be poured into a small container for convenience.
- Decoration can be done both on (plastic plates) and directly on the nail itself. The latter must be prepared; they mainly use extensions, and a layer of gel polish is applied to strong nails (if the design is not too voluminous and heavy).
- First, the brush is dipped into the liquid, and then into the powder of the required color. After this, the brush must be slightly twisted to form a ball of the desired size. Keep in mind, it all depends on how deep you dip the brush - if only the very tip, then the ball will turn out small.
- After this, the lump needs to be transferred to the plate, directly to the place where the overall composition will be formed. Knead the ball and give it the desired shape. If part of the image requires more time, dip the brush in liquid and continue working.
For a beautiful ornament, perforation plays an important role. Therefore, when working with a brush, you need to press on the formed lump as clearly as possible, “developing” each contour.
- You need to form balls for each individual element, using different colors.
Form large elements first, then move on to small ones. Otherwise, you will not be able to control the creation of the overall drawing and subsequently it will differ from what was planned.
- Some craftsmen paint the elements after the figurine is formed, that is, they use powder at the final stage. In this case, you should wait until the acrylic dries and act as carefully as possible, since the powder can soften the acrylic.
- Depending on the creative concept, the figures can be located along the edge of the nail plate, on the top layer of the plate, or in the middle. But you shouldn’t place the composition near the cuticle, it won’t last long there. If desired, you can add decor: rhinestones or beads.
One of the main conditions for a high-quality manicure is the correct location of the image on the nail plate. The main element of the composition should not be “chaotically scattered” on the plate - this way the idea will lose its direct style and will look ridiculous.
In what cases can acrylic NAIL ART be used?
Sculpting on nails with acrylic, the photo demonstrates this, not for everyday wear. And it has its drawbacks: it is inconvenient for doing work with your hands, constantly clings to clothes, and loses its durability when in contact with water or chemicals. When agreeing to such a manicure, it is important to follow a number of mandatory rules, otherwise all the advantages will easily turn into unpleasant moments. Therefore, the beautiful half of humanity resorts to such a manicure exclusively on special occasions: weddings, anniversaries, social events.


Moreover, each event has its own unique design. Brides choose a delicate and touching design, replete with flowers, butterflies and hearts; business women may be asked to “sculpt” an interesting drawing with a predatory animal or reptile. Also, some women use acrylic modeling with additional decor to make an impression. Such a manicure will always lift your spirits and add self-confidence. When preparing for any event, you should not do acrylic modeling yourself, especially if you do not have enough experience. The result will definitely disappoint you, and it will take a lot of time. It’s better to entrust the work to professionals, and you can hone your skills using the original NAIL ART technique later.


Fashion trends and the latest techniques in the world of nail art are updated from season to season: something goes into oblivion, something changes, adapting to new trends, and the sculpted nail design in the photo shows the final product of its own evolution. This technique is one of those that has been able to adapt to modern times. From large flowers and almost life-size butterflies, the sculpture has turned into a stylish design that sets the tone for your entire look.
Fashion trends for manicure with sculpting in 2018
The Internet is still awash with photos of tacky long stiletto claws or square plates with monstrous acrylic flowers. Oh, those 2000s... “Star Factory”, jeans with a low waist, and clumsy modeling on nails still won’t leave the minds of many masters.
It’s high time to notice that in 2018, all fashion trends in nail art are taking place under the auspices of minimalism, this also affected the sculptural decoration of nails. Nowadays, marigolds are decorated only with small-sized and not very convex decor; basically, one, or at most a couple of fingers are allocated for it.


Two types - two stars
Artistic masterpieces are sculpted from acrylic and special gel. If earlier creativity could only be done on artificial nails, now figures are often formed on natural plates coated with gel polish.


Acrylic systems
Realistic decorations are made from acrylic powder combined with a special liquid called monomer. By mixing powder with monomer, you get a plastic polymer from which you can fashion whatever your heart desires! Interestingly, this material was initially used in dentistry, and then became widely used in nail art.
It will be very difficult to independently obtain an elegant flower from polymer the first time. The fact is that it hardens quickly and therefore you will have to act extremely quickly and very, very carefully. Therefore, it is better to contact a certified specialist if you are not confident in your own abilities. All those stunning examples of sculpting flowers on nails that you saw on the pages of masters are the result of diligent study in courses and long practice.
One of the main disadvantages of acrylic is frequent allergic reactions to the material and its unpleasant odor, similar to what is felt when a dentist drills a tooth. Also, many are put off from “trying the pen” in this field by the length of the process. On average it takes 2-3 hours to sculpt.


Volume gel
Masters have been thinking about turning gel into magical sculptures for a long time, but, as luck would have it, the usual gels for extensions in volumetric art did not want to help! Their viscous nature did not want to turn into something formal.
But more recently, gels with a dense structure have appeared and decoration lovers have breathed new life into the art of sculpting.
This material, unlike acrylic, has no odor and does not have to be mixed with anything. To the touch it looks like pliable plasticine, from which imagination and skillful hands create nail art. A significant plus is that the gel hardens under the influence of ultraviolet light, so the amount of time and attempts in trying to form an idea out of a ball is not limited.
The most popular types are:
- 3D gel for sculpting nails. Its dense and flexible structure is quite easy to work with, and with the help of such a gel, excellent examples of volumetric modeling are obtained.
- 4D gel is more rigid. To the touch it is indistinguishable from clay or plasticine. From a small piece with a grain of rice, you can form three-dimensional compositions with a pusher or dots. Some inconvenience is caused by the fact that it sticks to metal and hands, so the tools will have to be constantly moistened with liquid to remove the sticky layer.
Sculpting with gel will take a very long time, since each element must be dried separately in a lamp. If you connect two undried petals, they will merge into one shapeless blob.
However, there are more positive aspects in this technique. If you are eager to try to sculpt your idea yourself, then start with the simplest figures.


Volumetric art in practice: how to sculpt nails
If you still have nostalgia for the wonderful sculpting on your nails, then you can easily show your creative impulses and remain a fashion winner with new items of wonderful design.
Nail experts are strikingly unanimous in instructing beginners: you should not conduct your first experience with acrylic or gel on your nails! First, try making a flower or butterfly on paper or foil, or attach the material to tips.
Acrylic modeling master class
It is believed that it is better to master the art of sculpting first of all with acrylic.
You will need:
- Acrylic powder in several colors.
- Gel polish.
- Monomer.
- Sculpting brushes made of dense and elastic natural bristle.
- Tips.
- Cover the tip with gel polish and dry it.
- Dip the brush into the monomer and place the very tip into a jar of powder.
- An acrylic ball instantly forms on the brush.
- Put him on tips. This droplet can be given any shape with a brush.
- You need to act quickly: as soon as the drop loses its shine and becomes matte, polymerization will occur and the drawing can be considered complete. The substance reacts to the air temperature in the room - the warmer it is, the sooner it hardens.
You can see in detail how acrylic sculpting on nails occurs in this video:
Master class with 4-D gel
Just recently, you would have had to pay a lot of money and sit through painful hours with a master to get a beautiful design on your nails. With the advent of 4-D gel, the process has become so simplified that even a beginner can create his own unique design.
You will need:
- Sculpting gel.
- Gel polish, base and top coat.
- Dots.
- Pusher.
- Klinser.
- Prepare your nails for a manicure.
- Apply a layer of base and after drying, paint with gel polish.
- After drying the pigment, remove the sticky layer.
- Use a dot to scoop the gel out of the jar.
- Using your fingers moistened with a cleaner, roll the ball into a small “sausage” and press it against the plate.
- Take two more smaller pieces of gel and place them in the area near the cuticle on the other fingers.
- Stretch the gel well on the plates and move the “plasticine” with a dot, wiping the holes, stretching it into something like lace. Do not forget to periodically moisten the rod in a cleanser.
- If desired, you can complement the decor with rhinestones.
- When the entire composition is ready, send your creation to the lamp.
- Finally, cover the result with topcoat.


As you can see, the technology is simple, in just a few minutes, remembering your art lessons at school, you get original art!
With an obedient gel, over time you will learn to create luxurious masterpieces. In the meantime, enjoy how this is done in the video:
I made it from what I had: a beautiful nail design with sculpting in photo examples
So far, the most popular sculpting designs on nails are the notorious flower petals, but even from them talented nail artists create far from banal ensembles. At a short length, small flowers create entire fields of chamomile, and on an almond-shaped form, craftsmen create stunningly beautiful silhouettes of roses covering the entire plate. If desired, you can build a single composition on two adjacent nails, decorate your design with rhinestones...
The uniqueness of the sculpting is that this decor is suitable for any shape and length. Admire the design examples below and choose the one you like.


Of course, voluminous art is not the most convenient for everyday use. Some elements will cling to your clothing and may cause inconvenience if, for example, your job requires you to wear gloves. Sculpted nail designs, as you can see from the photo, are more suitable for a holiday manicure. Modeling in nail art is adored by brides, graduates and simply creative people. Extraordinary 3D drawings will definitely give your image originality and sophistication!
Volumetric design on nails is one of the most interesting and beautiful nail art solutions. Nail sculpting is made from acrylic or gel and has several levels of complexity. In everyday life, one or maximum two nails on the hand are decorated with this design. When doing a formal manicure, especially a wedding one, you can allow sculpting on all nails. Such art will not go unnoticed and will always give your hands more femininity and charm. In this article you will find a detailed video and information on how to make sculpting yourself.
 Modeling with plasticine on nails photo
 What kind of modeling is there?
Modeling can be made from two types of materials - acrylic and gel. You can do it not only on extended nails, but also on your own. In the latter case, the nail plate must be coated with varnish. Modeling also varies in level of complexity: it can be single-level, two-level, multi-level. The sculpting can also be flat; this is most often done for an aquarium nail design.
It is easier for beginners to start learning with acrylic modeling. This material is more plastic and pliable. Having mastered the acrylic technique well, you can switch to gel.
The entire emphasis of sculpting is on the fact that with the help of this technique a stunning three-dimensional design is created. Flowers seem to come to life, patterns look unusual, compositions captivate the eye. Truly, nail sculpting is a real art. But not everything is as complicated as it seems. Anyone can master the technique of volumetric design if they have the desire, a little patience and faith in their abilities.
 Gel sculpting on nails photo
 How to make nail sculpting yourself?
No nail technician was born with the ability to sculpt. Everyone, even the most talented specialists, first underwent training. Any girl can learn how to do sculpting on her own if she has an interest and desire for it. Today on the Internet there is a lot of both text information and video tutorials, which describe and show in detail how to do volumetric nail design. Start training with acrylic; when you master working with this material well, you can take on gel.
 Nail sculpting design photo
 Acrylic modeling
To start self-study you will need:
- Colored and white acrylic powder;
- Brushes for acrylic modeling made of natural bristles;
- Liquid (monomer);
- Cup for liquid;
- Tips;
- File, buff.
Please note that the tips of the brushes are absolutely smooth and collected, as in the photo below. The brush is important in sculpting.
In order for acrylic to adhere well to the tip, it must be roughened with a nail file, otherwise the material will flow off the smooth surface. You can also coat the tips with varnish, wait until it dries and start sculpting. Acrylic adheres very well to the varnish surface.
Remember that nail sculpting should not look too “overloaded”. You should not put more than one flower or ornament on one nail. It is better not to place compositions on the very edge of the nail plate or close to the cuticle. To make the design look more voluminous, you should use two or three colors of acrylic powder.
Gel sculpting
For gel sculpting you will need:
- Set of colored gels;
- Brushes with synthetic bristles;
- UV lamp;
- Tips.
 3D sculpting on nails photo
 How to design nails with colored gels
There are several methods for how to design nails with colored gels, but most artists adhere to the standard scheme.
The sequence of performing nail designs with colored gels:
- First, hand disinfection is carried out.
- They do a dry manicure, then use a special solution to remove the natural shine of the nails and degrease them.
- After completing these procedures, modeling of the free edge of the nail plate begins. The design is made using colored acrylic powder, which has different densities. You can choose colors at your discretion and combine them the way you like.
- After creating the main design, it is complemented with various design elements, such as rhinestones, small beads, dried flowers, nail paints, varnishes, etc. All this will give the pattern a complete look and enrich it.
- Using a special file, I process only the perimeter of the free edge of the nail.
- To achieve the waterfall effect, the nail is modeled using a transparent building gel. This is the final stage, after which the nails look as if under streams of water.
 Acrylic sculpting on nails photo
 This type of design has many advantages. First of all, waterfall design helps save a lot of time, as it is completed much faster than a traditional volumetric design of similar complexity. This time saving is achieved due to the filing procedure, which is performed only along the perimeter of the free edge of the nail.
As a rule, any manicurist who professionally deals with volumetric design has several types of high-quality colored acrylic powders, which can be matte, transparent, translucent, pastel, colored, and also contain various sparkles. Thanks to such diversity, you can create absolutely any plot and choose an original color scheme.
Using acrylic powder, create a base layer. When it hardens, they begin to decorate the surface of the nail. To make the drawing look three-dimensional, a variety of materials are used: acrylic powder, shells, lace, nail polish, beads, dried flowers. These decorative elements allow you to create both a traditional floral pattern and create an entire landscape design on the nail plate.