How to make an ice cream cup out of paper. Master class: craft from waste material “Ice cream. How to make a craft "Ice cream - popsicle" from matchboxes. Master class
If you're looking for a craft for your preschooler, try making paper ice cream. Your little one will be able to follow the simple instructions and be able to make his own ice cream for his favorite doll.
Don't know what to do with your child? Make paper ice cream with him! You will not only have a fun and useful time (developing your baby’s fine motor skills, his imagination and creativity, spatial thinking, patience and the ability to concentrate), but you will also receive a wonderful accessory for a dollhouse that your child will be happy to use in games.
Preparing consumables for ice cream
Before you get started, you need to stock up on everything you need. For crafts made using the origami technique, you only need scissors and colored paper. You can watch the video instructions on how to make this paper ice cream. By the way, by folding origami, a child will be able to learn to distinguish geometric shapes, and the process itself will be possible even for a preschool-aged child. Especially if you do not demand from him excessive accuracy and clarity of lines.
If you are making a craft with a 3-4 year old child, you can make a ice cream from paper napkins. To make it, prepare:
Two white table napkins;
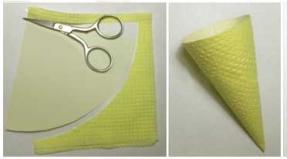
one yellow single-layer table napkin. It will be better if its surface is visually similar to a waffle towel, then your ice cream cone will look like a real one;
a sheet of thick cardboard;
PVA glue;
a spool of white thread;
compass;
scissors;
dried tea poured from one used tea bag.
Making ice cream from paper: procedure
Prepare a sheet of thick cardboard. Place a compass in the center of the sheet and draw a circle. Its diameter should not exceed the size of a yellow napkin. Now you need to cut out the circle and cut it into four equal sectors. Each piece will serve as the base for a "waffle cone" so you can make 4 servings of ice cream at once.

Take one of the cut out pieces and apply a small amount of glue to its surface. Glue the cardboard to the yellow napkin. Attention! Do not press down too hard, otherwise the napkin will become smooth and no longer look like a waffle cone. Roll the cone into a cone and secure with glue.

Crumple one white napkin into a ball. Fold the second napkin in four and place the crumpled one, previously formed into a ball, in its center. Tie the free edges of the second napkin under the ball with white thread. Coat the inner edges of the horn with glue. Place the ball into the horn. Apply a little glue to the popsicle ball and then sprinkle it with pre-dried infuser from a used tea bag. Now your ice cream will seem to be decorated with “chocolate sprinkles.”
Our ice cream is ready - now you can safely open an ice cream parlor and invite guests for a treat! Next time you can do something different by searching for master classes on the Internet. Such crafts are a great opportunity to develop a child’s imagination. If the baby cannot yet cope with the work on his own, help him, but do not do all the work instead of the baby. Your ice cream may not look like a work of art, but the creative process is more important than the final result!
Well, the ice cream season is over, what a pity. So why not make it from papyrus paper and cardboard?
Try making this craft with your children. Children always love to make things, especially if their parents help them with this. This ice cream will be a great decoration for any children's party. They can also be used as an interesting and unusual gift!

You will need:
- beautiful and bright paper
- thick kraft cardboard
- scissors, pencil
- leg-split
- double tape or hot glue gun

Step 1: Cut the tissue paper into small 12 x 6 rectangles. You will need 6 of these sheets per flower. Lay them on top of each other, tie them with a string in the center, and then trim the ends (round the corners). Then carefully begin peeling off the paper to form a fluffy flower. Follow the images below.

Use different colors of paper to make as much ice cream as you want.

Step 2. Next you need to make paper cones (the base for the ice cream). Use the same template and wrap your craft paper around it. Cut it out and use double tape or hot glue to attach the cone.


You did it! Use them as cute baby shower decorations. Or put a small gift inside for an unusual gift wrapping.


The bonus of this decoration is that the flowers don’t fade!


Be sure to read other interesting articles:
Today we will make a very easy, but such a cool and delicious paper craft. What do children and adults love? What do you want to eat in the summer heat? Ice cream of course! And you can make it yourself from paper or napkins. The main thing is not to eat it, because it will turn out so delicious :)
For work we will need:
- toilet paper or napkins
- woolen threads (you can use simple ones, folded several times)
- wrapping or colored paper
- felt-tip pen or pencil
- glue stick

Ready to make the most beautiful ice cream with your own hands? Then let's start! :)

First we will make a “waffle cone”. To do this, draw lines along and across. You will get a checkered piece of paper. Just like a crispy waffle! All that remains is to carefully wrap the sheet in the horn. Secure with glue.

Now we will make ice cream scoops. And it couldn't be easier! Crumple a piece of toilet paper or napkin into a ball. Wrap with thread. Glue the ends of the threads to the paper.
They turned out great scoops of ice cream in syrup!
Tip: if you take paper or napkins of different colors, you will get multi-colored ice cream. This composition will look even more interesting.

Now let's place the resulting ice cream balls into the cone :) Lubricate one of the sides with glue and fix it in the cone.

Congratulations, you did it! The world's best paper ice cream is ready. Now you can give it to your mother or beloved sister.
Help us develop the site, tell your friends about it by clicking the button :)
Oksana Stol
This master class is intended for children of senior preschool age, teachers and parents.
Purpose: production of crafts and attributes for role-playing games
Target: making ice cream from waste material
Tasks:
Introduce the technology of making paper from packaging cardboard;
Improve practical skills in working with paper;
To develop artistic taste in children and adults, the desire to make something unusual with their own hands from waste material
V. Kruglikov
This is sweet joy
With chocolate crust
And this ice cream
Children love it in summer!
All children, without exception, love ice cream. And the dolls will never refuse such a treat. You can also play in a store or a cafe. Therefore, I propose to please our children and make toys with our own hands!
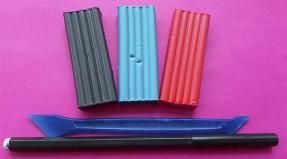
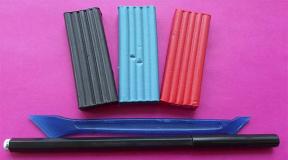
Required material:
Packaging cardboard (you can take ready-made packaging paper);
Holofiber or cotton wool;
Scissors;
Wax pencil;
Ruler;
Napkins or crepe paper;
Multi-colored threads;
Chocolate egg balls or packaging;
Banking rubber band;
Viscose napkins or other fabric
For joint creativity with children, you can take regular colored paper or cardboard.
I decided to take this paper, since I made this manual for a game and I wanted the ice cream cone to be made of dense material
This is the kind of ice cream we will make
Step-by-step manufacturing process:
Preparation of paper from packaging cardboard.
First option
Cut a square from the box and wet it with water

We wait a little for the top layer to get wet and carefully separate it into three parts


Drying the sheets (I got the sheets very wet, so I dried them with a hairdryer and ironed them a little)
Cut out squares measuring 10 x 10 cm

We make markings with a wax pencil, imitating the pattern of waffles.

Roll up a square sheet of paper and glue it

We fill it with holofiber, I dropped a little glue inside

On top you can sprinkle our ice cream with “chocolate chips” - used dried tea leaves, ground coffee. Glue with PVA glue, shake off any remaining residue.

Second option

Cut out a square of corrugated cardboard measuring 15x15cm

Roll up the square sheet into a ball

I used Titan glue, children use thinner paper, so they have safe glue
We make ice cream balls from napkins or crepe paper. Just crumple the pieces with your hands and tie them with colored threads (I use floss, glue the ends of the threads with glue.


We fill our waffle cone with balls (I put a little holofiber inside the cone)

Third option
For this ice cream, we need to take waste material that you have on hand (balls, chocolate egg capsules, elastic band, fabric or viscose napkins)

Cut out a square measuring 15x15 cm, roll it up or make a cone straight away and glue it together

We wrap the chocolate egg capsule with a cloth and collect it at the bottom with a rubber band

Apply glue and glue it into the horn

That's all our ice cream is ready!
You can play shop or treat the dolls!
Surprise your children with ice cream that will always delight them!
You can make a beautiful ice cream craft to decorate your holiday with your own hands! Ice cream that doesn't melt- this is an original summer decor for the holidays. Make such an unusual decoration and delight your guests!
website – Navigator in the world of gifts and souvenirs
It's hard to find a person who doesn't like ice cream! Here is an idea for an unusual souvenir that will remind your guests of a past event for a long time or will decorate a summer holiday or.
So, we need:
1) a ball (for example, a small paralon or foam ball for playing children's ping-pong),
2) 1.5 meters of light cotton fabric or colored ribbon,
3) sewing machine or thread and needle,
4) hot glue gun/glue or regular glue (Moment or Super Glue is best),
5) paper for scrapbooking (colored paper or wrapping paper are suitable),
6) template for the cone,
7) polyester for stuffing (wadding, unnecessary scraps of fabric),
8) pin.
Cut the fabric into strips measuring 110 by 4 centimeters. It is better to use scissors with zigzag blades. Using a sewing machine, sew the strips in the middle, gathering the fabric into small folds. Honestly, I would be more comfortable doing this manually. You will receive ribbons about 20 centimeters long. Although such ribbons are sold in any store, so you don’t have to sew them yourself.
Using a cone template, cut out a blank from paper. Glue the edges together to create a cone. It's better to use hot glue - it's faster. Fill the cone with polyester or scrap fabric scraps.


Cut a circle of fabric with a diameter of 20 centimeters. Wrap a foam ball in it, gather the fabric at the bottom and secure with hot glue (or a small but secure pin).

Apply hot glue to the inside of the cone and place the ball there. Cover the upper part of the cone with glue in a circle, attach a fabric ribbon.
Attention! After each stage, make sure that the glue has dried and all parts are securely glued.
If you want to hang the resulting ice cream, add a loop of ribbon using a pin or glue.


Surprise your guests with ice cream that will always delight them!