Duckling head mask for children. Universal bird mask (for example, sparrow). DIY New Year's masquerade mask made of papier-mâché: master class
New Year, masquerade or themed holiday - almost none of the events listed above takes place without a child wearing a carnival costume.
Quite often, children dress up as various funny animals. And an integral attribute of the carnival image is a mask. It is also needed for caroling with children. You can either make it yourself or purchase it in a store. However, a product made at home with the mother will be much more interesting for the child than a purchased one.
Papier-mâché is one of the simplest ways to make a three-dimensional mask for a carnival. Creating such a thing for Christmas or caroling is a creative process that broadens a child’s horizons and develops his imagination. Translated from French, the phrase “papier-mâché” means “crumpled paper.”


This technology appeared in the 16th-17th centuries in France. You can create a variety of three-dimensional shapes from paper using the papier-mâché technique. In this case, newspapers and office paper can be used to make products. Papier-mâché can also be made from cardboard, provided that it is not hard.
Papier-mâché goat face
This master class will show you how to make a papier-mâché goat mask for your head.

Materials for creating our mask
- newspapers or paper scraps;
- plasticine;
- thin, white paper (writing);
- paints - gouache or acrylic;
- brush;
- water;
- rubber;
- PVA glue.
Master class
- A papier-mâché goat mask can be made in different variations; there is no single pattern for it. Therefore, as a basis for a muzzle made of paper using the papier-mâché technique, it is necessary to sculpt a mold from plasticine, taking into account the size of the face of the person for whom the mask is being made.

- The base for the future must be placed in the refrigerator for 3-4 hours so that it becomes harder. When the base has hardened, remove it from the refrigerator.
- Pour water into the bowl. After this, pre-prepared newspapers or paper scraps should be torn into small pieces.

- Wet the surface of the plasticine base with water from a bowl. It is important that its entire surface is wet. After this, attach all the pre-torn paper pieces to the base so that it is completely covered with them. The entire goat mask should be covered with paper in 1 layer.
- Allow the first layer to dry a little, but do not allow it to dry completely. After this, dilute PVA glue with water in a ratio of 1 to 1. Dip a brush into the resulting mixture and generously lubricate the entire future face of the goat with it. At the same time, it is worth covering the surface of the muzzle with pre-made scraps of paper, periodically coating with diluted glue. From newspapers or scraps of paper, you need to make 3-4 layers on the base in this way.
- After this, similarly tear the white writing paper into small pieces. It also needs to be glued to the base in 3-4 layers. Don't skimp on the glue; the paper pieces should be well saturated with it.
- The base should be left to dry for about a day. After the goat's head is dry, you can remove the plasticine. You can cut pieces of plasticine using a stationery knife. You also need to trim the edges of the product with a knife so that they are smoother.

- The papier mache goat mask is almost ready. Now there is a white base that now needs to be painted. You can paint the goat according to your taste and color. Surely the child will be interested in putting his hand to decorating the face.
- In order for the mask to stay on your head, you need to attach an elastic band to the sides. To do this, use a hole punch to punch 2 holes. And thread an elastic band through them. Its length is measured so that the mask is securely attached to the child’s head.

As you can see, the goat mask is made with minimal materials and time. The painted face will be an excellent addition to a fancy dress costume. The product can be used by both caroling children and adults.

But if you don’t have any extra time to create an animal’s face, then you can use ready-made templates.
Using this pattern, you can make a mask of a kid or a goat.
Paper goat face
Using the suggested templates you can make a New Year's face of a goat. You need to download the template you like, and then print it on a printer and cut it along the contour. In order for the mask for children to be stronger, it must be glued to a cardboard base. An elastic band is used as a fastener in the paper muzzle of the animal.


Examples of other products
You can not limit yourself to papier-mâché goats and paper templates, but try to make other versions of masks. For example, make a New Year's goat's face from foam rubber.
A cute goat mask made of foam rubber is somewhat more difficult to make, but if you have the opportunity and desire to make it, then it’s worth a try. This muzzle can be used by kalyads and kids during the Christmas holidays.

You can also make the face of this animal from felt for the New Year.
The next series of children's matinees with fancy dress is being prepared in kindergartens.
Today, the ever-entertaining teachers decided to organize a costume ball of forest birds in the kindergarten.
The difficult task of parents once again falls to the creative task of preparing at least a mask (or even a carnival costume) for the matinee.
Naturally, it is better to do this together with your child.
The topic of today’s post is once again the answer to the question of how to make bird masks with your children: woodpecker, magpie, wood grouse, tit, bullfinch, goldfinch and crossbill for the matinee.
Today, together with the children, we will make bird masks with our own hands:
For adults, it is better to turn making masks of birds: woodpecker, magpie, wood grouse, tit, bullfinch, goldfinch and crossbill into an educational game. This will help you: a color printer or a black and white printer, perhaps acrylic pearlescent paints with glitter effects, a laminator (if you have one, of course - if not, you can attach the product to thick cardboard) and an elastic band or a piece of rope.
Any child wants his mask to be the most beautiful and cool in the group. This, a completely natural requirement, requires a creative and extraordinary approach on the part of parents.
So, together with the children, we will make masks of birds with our own hands: woodpecker, woodpecker, wood grouse, tit, bullfinch, crossbill and goldfinch.
2. Paste the saved mask template into a text editor (for example, Word) and stretch it onto an A4 sheet (you need to select portrait or landscape page orientation depending on the bird mask you choose).
3. Print out the bird mask template.
4. If printing is done on a black and white printer, then it is necessary to give the child the opportunity to creatively color the masks of birds: woodpecker, magpie, wood grouse, tit, bullfinch and goldfinch (it is better to use professional acrylic mother-of-pearl paints with glitter effects, silver or gold effects (they can be found in an art salon), as well as special gels with shiny elements (sold in stationery stores)).
5. After the bird mask: woodpecker, magpie, wood grouse, tit, bullfinch, goldfinch, crossbill dries, it is better to laminate it and cut it out along the contour.
Below are bird mask templates that will help you adequately solve the difficult task of organizing carnival costumes of birds: woodpecker, magpie, wood grouse, tit, bullfinch, crossbill and goldfinch for your child.

Paper magpie mask. Masks of forest birds. Make a children's carnival magpie mask made of paper with your own hands.


Bullfinch mask made of paper. Masks of forest birds. Make a children's carnival bullfinch mask made of paper with your own hands.


Woodpecker mask made of paper. Masks of forest birds. Make a children's carnival woodpecker mask made of paper with your own hands.

Paper tit mask. Masks of forest birds. Make your own children's carnival tit mask made of paper with your children.


Capercaillie mask made of paper. Masks of forest birds. Make your own children's carnival capercaillie mask made of paper with your children.


Goldfinch mask made of paper. Masks of forest birds. Make a children's carnival mask of a goldfinch made of paper with your own hands.


Woodpecker mask made of paper. Masks of forest birds. Make a children's carnival woodpecker mask made of paper with your own hands.

Spring has come, summer is approaching. The next series of children's matinees with fancy dress is being prepared in kindergartens. Today, the ever-entertaining teachers decided to organize a costume ball for poultry in the kindergarten.
The difficult task of parents once again falls to the creative task of preparing at least mask (or even a carnival costume) to the matinee. Naturally, it's better to do this Vplace with a child.
So, the topic of today’s post is the answer to the question of how to make place with children, with your own hands masksbirds: gosling, duckling, goose, duck, turkey, rooster and chicken for the matinee.
Today, together with the children, we will make bird masks with our own hands:
It's better for adults to turn making masksbirds: gosling, duckling, goose, duck, turkey, rooster and chicken in educational game. The following will help you with this: a printer, perhaps acrylic pearlescent paints with glitter effects, a laminator (if you have one, of course - if you don’t, you can attach the product to thick cardboard) and an elastic band or a piece of rope.
Any child wishes him mask was the most beautiful and cool in the group. This, a completely natural requirement, requires a creative and extraordinary approach on the part of parents.
So, with your children with your own hands let's do it masksbirds
2. Paste the saved mask template into a text editor (for example, Word) and stretch it onto an A4 sheet (you need to select portrait or landscape page orientation depending on the one you choose masksbirds).
3. Print the template on a printer masksbirds.
4. Give your child the opportunity to color creatively masksbirds: canaries, parrots, owls and guinea fowl(it is better to use professional acrylic pearlescent paints with sparkle effects, silver or gold effects (they can be found in an art salon), as well as special gels with shiny elements (sold in stationery stores)).
5. After maskbirds: gosling, duckling, goose, duck, turkey, rooster and chickenV Once it dries, it’s better to laminate it and cut it along the contour.
Below are bird mask templates that will help you adequately solve the difficult task of organizing carnival costumes birds: gosling, duckling, goose, duck, turkey, rooster and chickenfor your child.


Together with the children, we make a children's carnival rooster mask out of paper with our own hands. Cockerel mask made of paper


Together with the children, we make a children's carnival rooster mask from colored paper with our own hands. Paper rooster mask
2126
Any holiday event for children will be much more exciting if it is costumed. New Year, a themed party in kindergarten or a birthday, costumes of fairy-tale and cartoon characters will add a little magic and mystery, delighting not only children, but also parents.
You can purchase masks for any holiday, but it is much more interesting to make a mask with your own hands. The most accessible materials are paper and cardboard. What else you will need for work, how to make and decorate a mask for the holiday - later in the article.
New Year can rightfully be called the most favorite children's holiday. Waiting for New Year's miracles, gifts from Santa Claus under the tree and, of course, the celebration itself. The New Year's carnival involves the presence of a fancy dress and mask.
The best ideas for children's masks for the New Year are considered to be:
Animals:
Characters from Russian fairy tales:
- Baba Yaga;
- Zmey Gorynych;
- Ivan Tsarevich;
- Koschey the Immortal,
- Princess Frog
Heroes from domestic animated films:
- Snowman;
- Snow Maiden,
- Snowflake;
- the wolf and the hare from “Well, wait a minute!”;
- cat Leopold and mice.
Characters from foreign animated films:
- Snow White;
- Snow Queen;
- Mickey Mouse;
- Goofy the Dog;
- Santa Claus.
Marvel Studios Super Heroes:

The Halloween holiday, which came to Russia from Western culture at the end of the last century, was immediately loved by children and teenagers.
Ideas for this holiday could be:
- Mr/Miss Pumpkin;
- Dracula;
- scull;
- bat;
- little witch;
- Frankenstein;
- casting;
- sad harlequin;
- evil clown
For a themed birthday party, ideas can be drawn from fairy tales, popular cartoons, and children's films:
- spongebob;
- Winnie the Pooh;
- Shrek;
- Elsa;
- Smeshariki.
Tools and materials for making masks
A paper mask can be easily made with your own hands.
For production you need:

This is the minimum set for work. Depending on how complex the mask is, you may need additional tools and materials for decoration.
Ways to decorate masks
Masks made of paper and cardboard can be simple or complex. The better the idea and quality of workmanship, the more interesting the main item of clothing for the child will seem. Even the simplest head mask can be turned into a work of art. What will you need for this?
Materials for decorating masks:

You can use any paints for decoration. It can be gouache, watercolor, or acrylic. Acrylic paints have a bright and rich palette of colors. For decoration, you can purchase special acrylic products that can be used to add volume - contour paints, liquid glass.
Can be used for decoration with craquelure varnish and acrylic paints. Craquelure, when applied to paint, creates cracks, covering the surface with intricate patterns. The decoupage technique allows you to decorate with various floral or abstract designs.
Gouache is a quick-drying paint with a bright palette, perfect for decorating white paper or cardboard from which the mask is made.
Wolf Mask: Making Master Class
To work you will need:

Step-by-step production:
- You should practice first to draw a wolf's face. The volume of the mask will be given by details made of colored paper and a special cut of the mask.
- Measure the circumference of the child's head. The width of the mask should be one third of the circumference.
- On gray cardboard draw the outlines of the mask– nose and cheeks. Draw holes for the eyes. The height of the mask can be half the face or completely cover it.
- For added volume make cuts from the middle of the eye to the edge of the mask.
- Cut out the ears separately. They must have allowances at the bottom for gluing to the mask. Bend the allowances and make cuts on them so that it is convenient to glue to the base. Make cuts in the middle of the ears and glue their edges so that the ears become voluminous, wrapped inward.
- Made from black paper cut out the top of the head and the edge of the ears. Glue the parts.
- Cut the ribbon in half. On the sides of the mask, strengthen the place where the tape is attached with pieces of craton. After making holes, thread the tape through them, leaving short ends on the front of the mask.
- Cut from white paper lower part of the wolf's muzzle– eyes and cheeks, glue the details onto the base. At the same time, this part of the mask will cover the ribbons for the ties.
- From gray paper cut out thin circles and cover the cutouts for the eyes with them.
- Made from brown paper cut out the nose and stick it on. The wolf mask is ready.
Bunny mask – 3D cardboard mask
To work you will need:

Creation process:
- Make a one-piece mask template with ears on paper. Two parallel fold lines will run from the tips of the nose to the top edge of the cheeks. Make darts on the sides of the cheeks - from the nose to the edges with allowances for gluing. Cut holes for eyes and strings.
- Attach the template to the cardboard, securing it with tape, outline, draw dotted lines for folds.
- Remove the pattern and cut a mask from cardboard. Draw the fold lines with pressure. Do this in such a way as not to damage the cardboard and make it easier to bend the material in the right places. Cut out eyes and holes for ties.
- Cut out the mask. Bend the mask along the line of the nose and along the grooves. Glue the grooves. Leave the glue to dry. To ensure the strength of the gluing area, it does not come apart.
- After the glue has dried, the mask can be decorated. Cut out inner ears, eye rims and cheeks from white paper, and glue the parts. Draw dots on the cheeks to imitate a mustache.
- Thread elastic tape through holes, tie a knot on the reverse side to keep the ribbon in place.
Dimensions for mask:
- Height – 20 cm
- Top edge width - 10 cm
- Mask width - 20 cm
- The height of the ears is 10 cm, the width of the base of the ear is 3-4 cm.
- The depth of the grooves is 9 cm, the width of the grooves is 5 cm.
Bear mask: Making master class
A quick way to make such a mask out of paper with your own hands, cutting out a total of 6 circles.
For this you will need:

Step-by-step production:
- On the cardboard, draw a circle with a diameter of 16-20 cm - the basis of the mask.
- Draw and cut out circles from colored paper. From brown paper a head, 16-20 cm in diameter, and 2 circles for the ears, 4-5 cm in diameter. From yellow/orange paper, a muzzle, 6-7 cm in diameter and 2 circles for the inner ears, 3-4 cm in diameter. Glue on the parts on cardboard. Cut out a nose from black paper. Draw a mouth on a muzzle made of light paper.
- Glue the ears together - place a circle of light paper in the middle of the brown circle. Attach them to the head so that they peek half over the edge.
- Cut out holes for the eyes.
- Attach an elastic band. You can make holes and secure the tape with knots, or you can attach it to the mask using a stapler.
Horse mask
To make it, you can use regular cardboard, which you can then decorate with gouache. Then you only need to cut out the base and ears. For decoration, use foam rubber, adding eyebrows and a voluminous nose to the bear.
To make a horse head mask you will need:

Manufacturing:
- Use cardboard to make a frame for a head mask in the shape of a hat. To do this, cut a ribbon 3-4 cm wide from cardboard, with a length equal to the circumference of the child’s head. You will also need 4 strips, a length equal to half the volume of the head.
- Fasten the long strip with a stapler in the shape of a rim. Fasten two short strips crosswise and attach them to the rim, creating a frame. From the other two strips, make an oval frame for the horse's muzzle and attach it to the base.
- For the horse's neck, cut out a rectangle from cardboard 5-6 cm high, with a length equal to half the circumference of the head. Secure the paper with a stapler to the back of the rim.
- Cover the mask with colored paper, crumpling it a little for convenience. Make holes for the eyes. Secure the paper with glue or a stapler. From white paper, cut a strip along the length from the horse's nose to the withers, and glue it.
- Cut out the ears from brown paper, leaving allowances for gluing to the head - 4 parts. Glue them together with the wrong side, attach them to the top of the head.
- Cut thin strips of brown paper 5-6 cm long and 1 cm wide. This will be the mane. Using scissors, twist the ends of the strips, stick from the top of the head to the bottom of the neck and make bangs.
- Cut out semicircles for the horse's eyes and nose from black paper and glue them on. The mask is ready.
Baba Yaga mask (papier-mâché)
An evil character from their Russian fairy tales with a hooked nose, how can I make this mask more like the original?
For this you will need:

Step by step process:
- First you need to make Baba Yaga's face. To do this, take a plastic mask, newspaper for pasting, PVA glue, and water.
- Lay out the first layer on the mask with paper soaked in water, without glue. This is to easily remove the resulting mask. Next, you should glue several layers (3-4 layers) of paper soaked in glue. Leave the mask to dry for several hours.
- Make the nose and chin of Baba Yaga. To do this, make a nose with a hook from plasticine, like a mask, cover it with paper and glue, and also leave it to dry. After drying, cut the nose in half and take out the plasticine. Glue the nose to the face with pieces of paper. Make a chin out of plasticine and also make a piece out of paper. Wait until completely dry.
- In the mask, cut holes for the eyes, or for the mouth, holes in the nose for breathing. Collect the mask. The nose and chin are attached to the mask with pieces of paper soaked in glue.
- To make eyebrows, twist twigs out of paper, soak them in glue and attach to your face. Make holes along the edges of the mask for ties. Thread the ribbon from the inside out, tie knots inside.
- Decorate the finished mask.
Fish mask
It is best to make such a paper mask with your own hands in the form of a crown-hoop on your head.
For this you will need:

Work process:
- Draw a fish, color it and cut it out.
- Make a hoop out of paper around the circumference of your head.
- Glue the fish in the middle of the hoop.
You can decorate the fish with feathers and foil.
Another way to make a fish mask:
- Draw an oval according to the shape of the face on white paper. Color it like Nemo the fish, alternating white and orange stripes with thin stripes of black.
- Make holes for the eyes, draw the mouth of the fish.
- Glue fins to the top and sides and make them yellow.
- To attach the mask, make a hoop out of paper and glue it to the mask.
Bird mask
To work you will need:

Step-by-step production:
- Fold a sheet of thick paper in half and draw a mask in the form of large glasses. Draw the eyes and make a recess for the beak. This part of the mask will be attached to the base separately.
- Cut out the mask and slits for the eyes.
- Make a beak. To do this, measure the distance from the bridge of the nose to the bottom of the mask - this is the width of the beak. Bend the cardboard in half, measure the resulting length from the fold and draw a line from the top to the fold. The result will be a triangle with equal sides. If desired, the beak can be made long or short, slightly curved at the edges. Leave an allowance of 1-1.5 cm at the base of the beak for gluing it to the mask.
- Cut the allowance on the beak in several places and bend the cardboard. Cover the beak with yellow paper. Using the allowances, glue the part to the mask.
- Try on the rubber band, cut it to the desired length and secure it with a stapler.
- Mask decor. To do this, you will need to cut feathers from colored paper. Feathers can be leaf and crescent shaped. Fold the leaf-shaped parts in half to make them more voluminous. Glue the feathers onto the mask with an overlap. Feathers may extend beyond the mask at the edges.
- For the eyes, cut out circles to carefully decorate the cutout and glue on. The mask is ready.
- To decorate such a mask, you can use natural feathers, braid to decorate the eyes, rhinestones and beads.
Goat mask
For such a mask you need very little:

Step-by-step implementation of the mask:
- Draw a mask according to the size of the face, shaped like an inverted pear. On the top of the mask, make two cuts 2 cm deep. Cut out holes for the eyes.
- At the bottom of the mask, draw the nose of the goat, making cuts.
- Glue the cuts at the bottom and top to add volume to the mask.
- Cut out the horns and ears, glue them on, and make holes for the ties.
- Thread the ribbons through the holes and secure them with a knot on the reverse side.
If desired, the mask can be decorated or covered with colored paper.
Mask – frog
Materials and tools for the frog mask:

Mask making process:
- Cut an oval out of cardboard, shaped like a melon. The height of the mask is 15 -17 cm, the width is half the volume of the head.
- Make two grooves. To do this, draw a line in the middle on the mask. The upper recess from the frog's nose to the edge, approximately 7 cm long, 1.5-2 cm wide, leave allowances for gluing. The lower recess is 1-1.5 cm high and 1 cm wide in the middle of the chin. Draw and cut out holes for the eyes, a mouth for a smile, holes imitating a nose.
- Glue the grooves.
- Cover the mask with paper, draw out the details - nose, eyes, eyebrows.
- Secure the mask to the hoop using superglue. For strength, you can cut strips of paper to glue the hoop to the mask. The hoop will hold the mask well on the forehead and will prevent it from bending too much and losing its shape, as when using ties.
When making a mask for a girl or a frog princess mask for decoration, you can use:
- foil, yellow paper;
- rhinestones or beads.
Make a small crown out of yellow paper, decorate it with pieces of foil and the bottom with beads. You can add red lips.
Spiderman mask
To work you will need:

Making a mask:
- From red cardboard, cut out an oval according to the shape of the face plus 3-4 cm allowance along the edge of the oval. Make slits for the eyes and holes for the nose. Even though Spider-Man doesn't have a nose, he still has to breathe somehow.
- Cut out a triangle from white paper - the spider's eyes, stick them on and use a black felt-tip pen to outline the eyes, not forgetting to cut out circles for the eyes. Draw a spider pattern on the mask with a black felt-tip pen.
- To make the mask voluminous, make cuts on the mask. Two at the top, approximately from the eyebrow line to the edge of the mask, and two on the chin. Glue the edges of the cuts.
- Secure the elastic band to the edges of the mask using a stapler. The super hero mask is ready.
iron man mask
All the boys are crazy about this steel hero. This carnival costume and mask is an excellent solution for any costume party.
To create a paper mask with your own hands, you will need the following materials and tools:

Execution:
- Draw the outline of the mask on red cardboard and cut out the shape.
- Make 2 pieces of ears out of cardboard and glue them to the mask.
- Place the mask on yellow paper and trace it with a pencil. Draw the yellow parts of the mask inside the outline. Cut.
- Glue the yellow part onto the red one.
- Draw the eyes and mouth of the iron man with a pencil. Make holes for the eyes.
- Use a marker to draw the details of the head, outline the eyes and mouth.
- Glue the tape to the back of the mask.
Scroll:
- If a child takes part in a production and will need to sing or read poetry, then it is best to make a mask on the upper part of the face or 2/3 of the face, leaving the mouth uncovered.
- To quickly make a mask, you can use a template or a ready-made pattern. You just need to print out the pattern, transfer it to cardboard or thick paper, glue it and decorate it.
- It is best to use acrylic paints for painting masks. They dry quickly, do not fade over time and do not get dirty. This mask can be used more than once. Gouache is also suitable for these purposes, but this paint gets dirty when exposed to moisture.
- You can not only glue decorations and decor onto masks made of cardboard or paper, but also sew them on and glue them with hot glue.
Making any paper mask with your own hands is quite simple. To do this you need a little imagination, simple materials and desire. Children take part in such master classes with great pleasure, contributing their ideas to the creation of masks for the holiday and inspiring adults to create small objects of art for the child.
Video: DIY paper mask
How to make a raccoon mask from cardboard, watch the video:
DIY New Year's masks in the video:
POPULAR POSTS

Festive matinees in kindergartens or elementary schools are often held in the form of theatrical performances. Every child participates in the celebration. For an interesting performance you need appropriate costumes and head masks. You can buy them in specialized children's stores or make them yourself.
Different materials are used to make masks. Most often - paper and cardboard. The picture is downloaded, enlarged on the computer screen, and then printed.
The sketches can be colored; the child just needs to cut out the model. There are black and white or theatrical coloring masks. These need to be colored with pencils or paints at your discretion. Leather, foam rubber, felt and other materials are also used in production.
The shape of the masks is also different. Some are made on a wide rim. The image of an animal or fairy-tale character is glued to the headband and placed on the head, while the child’s face is not covered. Other sketches hide the face, and cuts are made for the eyes. There are masks, respirators, gas masks (rubber elements are usually used for their manufacture) or on a stick.
From paper


Cardboard


Leather


From felt


From foam rubber

On a stick


Sketches of headbands


For girls


When choosing sketches for girls, they give preference to funny animal faces. For example, a bear or a bunny with a pink bow, masks in the form of powerful fairies or beautiful princesses.
For boys


A holiday mask for a boy depends on the child’s character and preferences. Some kids love to portray not only good animals (bear cub, cockerel, piggy, hippopotamus), but also pirates, sorcerers, supermen, and villains.
Animal faces

Costumes and masks of forest and domestic animals are a common option for holding a matinee. Some children prefer to dress up as cats, dogs, hares and other recognizable animals (bull, goat, wolf). Others want models of less common animals - raccoon, moose, platypus or koala.
A universal option is the “mask of the Year”. It symbolizes the animal according to the eastern calendar. For 2019, the faces of a pig, piglet, and wild boar are relevant. They can be made not only from paper, but also sewn from fabric. Patterns and sewing patterns make it easy to complete the task.
Foxes


Hare


Bear

Wolf


Leo


Tiger


Raccoon


Crocodile

frogs


Fish


Hedgehog


Zebras

Deer


Leopard

Elephant


Monkeys

Snakes


Squirrels

Rhinoceros

Turtles


Giraffe

Rats


Hamster


Polar bear

Panthers

Sharks


Lizards

Bird patterns

Having selected ready-made sketches, they are saved or copied for subsequent printing, and the masks are cut out. They are usually used as a headband without covering the baby's face. To make a full-fledged mask, you need to make an effort. The specificity lies in the anatomy of the bird's head. You need to prepare a template for the head and beak separately. The bird's beak is glued along the marked lines. Its size and shape depend on the bird - for an owl it will be small and hooked, for a crow it will be long and sharp.
Sparrow


Orla

Galchonka

Owls


Crow


Cuckoos


parrot


Herons


Pavlina

Insects

Masquerade masks of representatives of the insect world are less popular among children. But they are also suitable for the holidays. And baby centipedes, cockroaches, flies or mosquitoes will stand out among dozens of cats and dogs. Children will love the costumes of the grasshopper Kuzi, the ladybug Mila, grandfather Sher and woman Kapa and other friends of Luntik.
Ant

Spider

Bees


Grasshopper

Butterflies


Beetle

Ladybug


Pictures of pets

Masks are often used for photo shoots. Parents can take funny photos of their child themselves. The look will be created by cat ears with a tail, paper glasses, and a funny hairstyle.
Mouse, goat or chicken masks are suitable for the theater or circus when children are taken to New Year's performances. Older children or parents of preschoolers can make three-dimensional masks according to the drawings. They are put on the head and cover the back of the child's head. Incisions are made for the eyes and nose. Children will like the head of a horse, boar, or donkey as models.
Dogs


Cats and Kota


Horse


Cows


Pigs


Mice


Rabbit


Goat


Barana


Donkey


Rooster


Chickens


Chickens


Ducks


Goose

Mask designs for cutting

There are different patterns that do not always symbolize animals. Children love cool costumes; a mask of a plague doctor, a mad genius or a gypsy is suitable for them. Some people play evil characters at matinees. In this case, masks with the face of the devil, an old sorcerer or uncle Chernomor would be relevant.
The black and white masks are painted by the children themselves. The advantage of sketches is that the child shows creativity. His cow comes in purple and his goat comes in flowery pink. After the matinee, the organizers organize competitions for the most interesting or original face mask.
When creating a New Year's image, masks of snowflakes, Father Frost, Snow Maiden or Baba Yaga are suitable. If a child does not want to wear a full-fledged mask, then the ears of a hare, fox or bear will suit him.
Emotion masks will convey a happy or sad mood. They are made in the shape of a sun or a popular smiley face.
Cool


funny


Beautiful


Carnival


New Year's


Scary


Evil


Coloring pages


Sketches

The facial expressions of the mask are of great importance. Even the most ordinary characters convey a palette of moods. They can be sad and cheerful, kind and angry, surprised and indifferent. This is achieved by drawing the eyebrows (raised, lowered, like a house), a smile on the face, and the position of wrinkles, if we are talking about a mask of an old man or woman. Emotions are conveyed not only by the faces of people and animals, but also by inanimate images: templates for masks of flowers (bells, roses, daisies), vegetables and fruits (apples, tomatoes, plums).
Grandfather

Robot

Indian


Carrots

Aliens


Olga Eremina
Now it's time autumn holidays in kindergartens. In our script autumn fun"Autumn is golden"there are two birds for which I needed to do cap masks. I decided to search the Internet for options, but I didn’t find many ideas. The most budget option, of course, is paper. I used whatman paper because it is dense and does not lose strength for a long time. After masks can be used for the holiday throughout the year for theatrical activities, in the Mummering Corner, for free play activities with elements of theatrical performance. It is better to use acrylic paints for artistic creativity, because, unlike gouache and watercolors, they do not get dirty and do not fade. When coloring, I tried to rely on realistic photo images of these birds ( sparrow - brown, white cheeks are visible, etc.) Only the eyes turned out stylized - bright, expressive. The main thing is that I was satisfied with the result" birds"- artists.
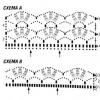
Eye options birds.

The circumference of a child’s head (by the way, the circumference of a 3-4 year old child on average is 50-51 cm, plus 3-4 cm for gluing.

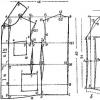
Beak pattern.

All the necessary patterns.

This is how the blanks turned out after gluing and assembling all the parts.

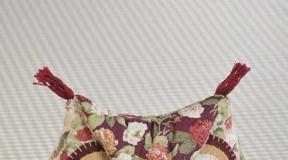
Ready tit mask.

Ready sparrow mask.
This is Egor trying it on titmouse mask.

I am the host and my small birds.

Creativity definitely brings joy and a sense of self-satisfaction! Be creative and have fun! I will be glad if this material turns out to be useful for my colleagues and parents.
Publications on the topic:
The last snow has melted. The buds had swelled and the first leaves were even peeking out. The birds have also perked up: sparrows are chirping and frolicking. So many interesting things.
Materials for the master class: colored double-sided paper, colored double-sided cardboard, scissors, bird silhouette template, simple.
How to arouse a child's interest in creativity. You need to make crafts that are simple and original. Here are families of funny owls and...
A mask is a very necessary attribute in kindergarten. Here you have fairy tales, here you have games. What holidays take place without masks? That's what we want today.
Collective composition "Falling Leaves" with children of the second group of early age and younger group. Autumn is a golden and wonderful time. In good weather.
I present to you my master class on making an autumn hedgehog with “live” needles: Step 1. Take woolen socks and fall asleep in them.