Paper box diagram. How to make a beautiful paper box with your own hands? How to make a box out of paper - what you need
A simple version of a paper box. This is my first instruction here and I tried to make it as clear and understandable as possible. Some steps were difficult for me to explain in a way that was clear, but I think everything will be clear from the photographs. If you have any problems, write in the comments and I will try to explain better.
I know that there are several versions of paper boxes made from A4 sheet, but I didn’t see my method here, so I hope it will be useful to you. Enjoy!
Stage 1: Materials

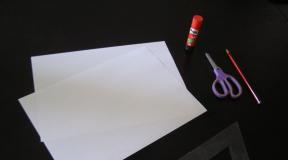
You will need:
- 2 sheets of plain office paper (box + lid)
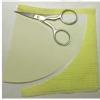
- Scissors
- Pencil
- Ruler
You may also need some glue.
Stage 2

Fold a sheet of paper as shown in the photo.
Stage 3

Draw a line with a pencil, outlining one of the sides of the resulting triangle.
Stage 4

Cut a sheet of paper along the line.
Stage 5

Now you have a square (you can throw away the extra piece of paper).
Stage 6


Now you must fold the square along the other diagonal and unfold it again.
Stage 7


Then fold all 4 corners of the square towards the center.
Stage 8


Fold one side of the square towards the center (as shown in the photo), then fold the opposite side in the same way.
Stage 9


Now we bend the just bent sides of the square. We turn it 90 degrees and bend the other two sides of the square in the same way.
Stage 10


Make cuts as shown in the photo. The cuts should be only at the top and bottom, they should not be too deep or short.
Stage 11


Unfold the top and bottom as shown in the photo. Fold the other two sides to form a box.
Stage 12


The final stage of assembling the box. We bend the remaining two sides. Ready!
Stage 13


Now, if you have a desire, you can make the bottom for our box, i.e. the box we made in the previous steps will become the lid (it will be difficult to insert one box into another if their size is the same). In order for the lid to fit easily onto the box, we will need a ruler.
It's pretty simple. First follow steps 1 to 5 and then measure and draw a pencil line 5mm from the top and right edges of the square. After that, cut off these thin strips. Now the bottom and lid will fit perfectly into each other.
It remains to repeat steps 6 to 12 and the box with a paper lid is ready!
Stage 14


If the inner triangles at the top bend downwards, they can be secured with glue.
Stage 15


All that's left to do is connect the boxes together.
The article will tell you how you can make it yourself and use a cardboard box. Here you will find templates and master classes on making boxes of different shapes.
A box is the easiest way to pack or hide something. The box can serve as an excellent means of storing things: jewelry, cards, small items and cosmetics. Of course, modern stores will provide you with a lot of options for boxes: large, small, curly, square, with lids, decorated and simple cardboard.
It is much more pleasant to create something with your own hands and decorate it the way you would like it and the way the product itself will correspond to the style of the holiday, room, or occasion. You can make a craft from absolutely any cardboard. The material can be purchased at a craft store (you will find a large selection of cardboard colors and textures), or you can use the kind in which household appliances are often packaged (refrigerators, for example, or washing machines).
For work you will need:
- Cardboard (as much as needed for your preferred size product).
- Hot glue (you can, of course, use any other glue, but hot glue is preferable due to its quick drying and strong bonding of the material).
- Template (with the help of it you can understand exactly how you should cut, bend and glue the material).
- Scissors and pencil - for marking and cutting. This is necessary to ensure that your product looks neat and aesthetically pleasing.
Flip lid box templateIMPORTANT: There are two main types of cardboard boxes with lids. One assumes the presence of a lid that covers the top of the box, the other - a lid that folds back, but is part of the box.
 Box template with cover lid
 How to make a box with a lid step by step:
- Prepare all the supplies, print the template for the box on a printer or draw it in the exact proportions on cardboard.
- Cut out two elements from cardboard
- Start folding the dotted lines and gluing them carefully.
- Press the edges firmly to hold the material together.
- Let the product dry a little
- After drying, you can decorate the box to your liking.
Video: “Box: master class”
How to make a round cardboard box: diagram, template
A round cardboard box is a very beautiful and practical product that will always find its use. Having decorated it to your liking, you can store jewelry and jewelry, sewing and embroidery kits, cosmetics, clippings and much more inside.
Making a round cardboard box is a little more difficult than, for example, a square one. However, it is quite possible to “figure it out” with your own hands, without spending a lot of money on materials. Use thick cardboard and follow the template provided exactly; you can only change the size, but not the shape of the parts.
How to make a round cardboard box, templates:
 Round Cardboard Box Template No. 1
 What parts does a round cardboard box consist of: template No. 2
  In what order should the parts of a round box be glued together: template No. 3
 Round cardboard box with handle: finished product
 Video: “Gift box or casket made of cardboard: detailed master class”
How to make a heart box from cardboard?
A heart-shaped box is much more difficult to make than a round or square box. However, if you follow the tips and templates, you can easily create this beautiful piece.
A heart-shaped box is not only a storage box, it is an ideal packaging for giving a gift to a loved one. Such a box can be filled with many surprises: sweets, souvenirs, trinkets, gifts, keychains, flower petals, even butterflies can fit in it.
IMPORTANT: The heart box is in many ways similar to a round box, but here everything depends on the bottom: if it is proportional, then the whole product can look neat and even. The box has two bottoms: internal and external, the walls of the box are attached according to the principle of a round box.
Different templates for making a heart-shaped cardboard box:

 Heart-shaped box template from one piece: template No. 1
  Heart-shaped box template from one piece: template No. 2
 Step-by-step work in photos:
 Prepare identical hearts: two bottoms and a lid
 Cover the bottom with the side of the box
 Fix and wait until completely dry, make a lid
 Video: “Heart-shaped box: master class”
How to make boxes from paper and cardboard?
Giving gifts in bags, cellophane wrappers and paper wrappers is no longer attractive and is considered a sign of “bad taste.” Your gift will look much more impressive in a paper or cardboard package that you glue and decorate yourself.
IMPORTANT: The size and shape of your box depends only on what exactly you will be giving. Heavier gifts require thick cardboard, but for small and light ones you can even glue a paper box together.
Boxes made of cardboard and paper, different templates:
 Simple Rectangular Box: Template
 Hinged Lid Box: Template
 Triangular box: template
 Simple square box: template
  Box-pouch: template
 How to make a box from colored cardboard?
In a modern creativity store you will find a huge selection of cardboard:
- Kraft cardboard (solid sand-colored material)
- Colored cardboard
- Velvet cardboard
- Holographic cardboard
- Glitter Cardboard
- Cardboard with prints, drawings and inscriptions
- Textured cardboard and much more
IMPORTANT: All this variety of choice allows you to create cardboard boxes of incredible beauty and use them for any purpose.
 Cardboard for creativity
 Video: “How to make a cardboard box?”
How to make a cardboard box without a lid?
If you need to make a cardboard box without a lid, you should also use a template. This product is perfect for storing personal items: pencils, cosmetic brushes, hair accessories and much more.

 Box template without lid
 Video: “Do-it-yourself box without a lid using origami technique”
How to make a cardboard box for candy?
Boxes of chocolates don’t have to be bought in a store; you never know exactly what will be inside. It’s always nicer to make a box with your own hands, fill it with candy to your liking and give it to a loved one. This will not only be a “delicious” gift, but also very original and special.

 Box with handles: template
 Box with a butterfly: template
  Triangle box: pattern
 How to make a jewelry box from cardboard?
It is very convenient to store jewelry, jewelry and watches in a cardboard box. You can buy it or make it yourself, decorating it to your liking. If desired, you can make one or several sections inside the box. 
 Template for flat box
Video: “DIY Flat Storage Box”
How to make a square box from cardboard?
A small square box can be used as a bomboniere or packaging for small surprises for your loved ones.

 Simple square box template
 How to make a triangular box from cardboard?
A triangular box can exist as a separate unusual package, or it can be part of a cake-shaped package.

 Triangular box template
 Do we decorate cardboard boxes with our own hands?
Decorating a homemade box depends only on how original and great your imagination is. The box should also be decorated based on the occasion (a holiday, for example, or the decor in the room).
How and with what you can decorate any cardboard box:
- Lace and fabric
- Satin ribbons
- Scoop and burlap
- Stickers and stickers
- Buttons and other accessories
- Sequins and stones
- Colored paper
- Kraft paper
- Drawings and inscriptions
Video: “5 ideas for decorating a box”
We all love gifts. Sometimes you want to give gifts made with your own hands. Or we need to make packaging for a purchased gift, and such packaging that it reflects our feelings. Most often, the gift is packaged in a box. So let's look at what boxes you can make. Consider rectangular and square boxes.
The simplest box
This box is without any special tricks. Without lid. Here is her diagram:

I must say that using the same pattern you can make boxes of different sizes. Therefore, the diagram indicated in centimeters can be enlarged. If you have a diagram, you can use it to make both a small and a large box. Depending on what size box you need. Looking at the diagram, we see that we must first draw a scaled view of the box to the required size.
If you need a dense box, then it’s better to make it made of cardboard. It will be stronger. You can even choose cardboard with colors. You can take white cardboard. The diagram shows the creation of a square box. Instead of a square one, you can make a rectangular one. To do this, you need to make changes to the proportions of length and width, to the proportions of the sides.
After careful drawing, carefully cut out the outer side of the drawing along the contour. Then we bend along the folds. We glue the edges for gluing. Consistently. Please note that the top of the box has folds on all sides. This is to ensure that the top is aesthetically pleasing and comfortable. We bend these bends. We glue it. All. The box is ready.
Boxes with finished lid
Here is the simplest diagram of such a box:

If you need a small box, then it is better to make it from paper with a density of 80 or 120. If you need a larger container for the gift, then you need to choose a denser material. When drawing, pay attention to the proportions. If you need a square at the bottom and top, and a rectangle on the sides of the box, make the proportions as in this diagram. Drew it. Cut it out. Bent. Glued together.
If you need a box with a ready-made lid in the form of a cube, then this diagram will do:

A minimum of material is needed here. Everything is simple and functional. Drew it. Cut it out. Bent. Glued together. You can paste additional pictures on the box for design.
There is a sketch of a rectangular box, already with tricks.

Here the edges for gluing are beautifully beveled, and the outer sides and top with lid have eyes for fastening. Such containers for gifts can also be modified at your discretion. The same circuit can have many variations within its implementation.
Another diagram of a rectangular gift box:

Creating such a craft is a little more complicated than the previous ones. There are additional side slots. This increases the strength of the container. The lid has additional wings - sides, which are inserted inside the box. The wings are made with roundness, aesthetically pleasing. Naturally, the proportions of the box in width, height, and length can be changed. Do what you need to do.
Boxes with top and inserts
If we want to make a rectangular box with a top and inserts, then this one is best suited:

This box is good because, thanks to the additional wings on the sides (put inside during assembly), it becomes stronger when gluing. And the lid with side wings and a front lock with a side overlap enhances the effect of the strength of the box (in the diagram, the lid with the front lock is drawn on the right side).
There is also a box with a top and inserts along the bottom of the box. Everyone has seen these boxes. Here's the diagram:

Let us immediately indicate that everything that is at the bottom of the diagram relates to the assembly of the bottom of the box. All the curly lines along which the incision must be made were made for a reason. The four halves of the four sides of the bottom, connecting in the desired configuration, form a tight adhesion of the bottom without any glue. The glue is applied to the box in only one place.
This place is indicated on the very left edge of the diagram - a side strip for gluing. You don't need any more glue for this box. The upper side wings are needed to provide rigidity to the lid that is lowered from above. And the lid itself has an additional valve that fits inside the box.
Boxes with separate lid
The easiest way to create such a box is shown in this diagram:

The sides that are wider are slightly larger. So that they can be folded at the top and glued inside too, for rigidity and aesthetics. The lid for such a box is easy to make. Take the main size 3 millimeters larger. The rest: the width of the sidewalls is at your discretion. Glue the inserts on the sides. Dry the finished products.
Another way to make a box with a separate lid. More aesthetic. Moreover, the box is not only beautiful. It also gains strength. Here is her drawing:

It’s convenient to make such a box because it’s easy to maintain the proportions, no matter what size you stick to. It is easy to draw using a square as a basis. The side wings are also easy to make at any scale, making the cut angle to the middle of the side of the virtual outer square. By folding such already cut material, you will get a product where the wings for gluing converge at the top on both sides. This gives the product not only aesthetics, but also strength. The sketch shows how to create a product both cubic and rectangular.
The diagram does not show how to create a lid for such a box. Yes, you don’t need to draw it. And so it is clear. To create the lid you need to apply the same scheme. True, draw a square 2 - 3 mm larger.
Since the sidewalls of the lid will be significantly smaller than the base, the wings for gluing need to be simply beveled at a certain angle in order to connect the sidewalls. When creating a lid, it is not necessary to make the wings for gluing all the way to the middle, towards each other. It is enough to make the wings for gluing simply at an angle.
Also, for those who want to learn how to make boxes, I have two links to videos where you can see how it’s done:
We don’t always have a box of a very specific size at hand for specific needs. For example, it would be nice to carefully put small treasures in it, divide gloves, socks, hairpins, handkerchiefs into compartments, or arrange a gift. Therefore, knowledge is worth a lot!
Take a square piece of paper. Carefully fold it in half diagonally. First on one side, then on the other. Expand the sheet.
Fold the sheet in half horizontally. Unfold it again. To achieve the best results in solving a simple task, how to make a box out of paper, you need to fold the workpiece carefully, each time carefully aligning the edges from corner to corner.

Repeat the folding action, but this time vertically.

At this stage of the lesson, from paper, you should get a sheet with crossed lines from the folds exactly in the center.

Fold all 4 corners one by one exactly to the center of the square, where the fold lines meet.

The upper half of the resulting workpiece must be folded in half.

Repeat the same action, but with the bottom half.

Bend the halves and release two opposite corners, as shown in the illustration:

Rotate the folded sheet 90 degrees.

Fold half of the workpiece from the top edge towards the center.

Fold the bottom edge towards the center as in the previous step.

Until now, doing origami and describing the process on paper seemed quite far from the final result. But at this stage of the lesson, the hand-made box finally acquires “sides”. To do this, open the newly folded parts of the paper 90 degrees.

Lift the open end while pressing on the corners as shown in the illustration until you have another “side” of the box.

Lower the top corner until it hits the exact center of the base of the paper product.

Repeat steps 13 and 14 on the other side.

This step is optional, but you can glue the raised corners to the bottom of the box if you wish. Ready!

To make a lid for the box, you need to take a paper square 4 millimeters larger than the previous one and fold it in the same way. Then connect both parts, and you will have a full-fledged box with a lid. Now you know how to make a gift box. Made from cardboard, of course, it will be stronger. A presentable box should be colored. Bright or in subdued colors - depends on the event.
Perhaps making a box will encourage you to learn how to make a paper vase or other equally interesting things. Don't forget to involve children in making these things. General classes are not only learning useful and interesting things, but also unforgettable moments of communication.
A paper box is a very valuable item because it can be used as a place to put a gift. And give a person a gift not openly, but in gift wrapping, that is, in a box. This is even more interesting, since any secret intrigues and arouses interest. Or you can store some of your things in it, for example, shoes. Almost anyone can create a box out of paper. There is nothing complicated in its creation.
How to make a box out of paper (1 method)
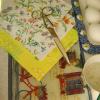
You will need: paper, decorations, scissors.
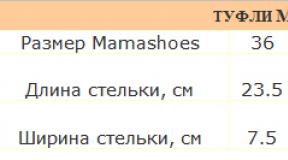
1. First we make the lid of the box. To do this, take paper measuring 21.5 cm by 21.5 cm and draw it diagonally. Lines connect opposite corners.

2. Bend one of the corners so that it looks towards the center (at the intersection of our diagonal lines). Afterwards, we bend it one more time so that the edge of this fold is flush with the strip drawn in the center. Then we unravel the figure and see that folds have formed, which we will need later.


3. We do the same thing that we did in point two with all other angles.

4. We make cuts on both sides as shown in the picture.

5. And we begin to fold our craft step by step.


6. After creating the lid of the box, we proceed to creating the bottom for it. To do this, take a piece of paper measuring slightly less than 21.2 cm by 21.2 cm. The bottom is made in the same way as the lid. When creating it, you take plain paper, unlike the cover, when it is best to use something colorful, containing several colors, perhaps even some kind of picture.


So you have made a paper box using our simple instructions. You can take other sizes for the box, but do not forget to make the bottom of the box 3 mm smaller than its lid.

How to make a box out of paper (method 2)
You will need a little patience and time, as well as thick paper of any color (you can use it with patterns, or you can use plain paper).
1. Since we are making the box in a square shape, the sheet of paper must also be given a square shape before starting to create the craft.
2. It is necessary to bend the paper square in half crosswise and carefully smooth the fold line so that it is clearly visible. Unfold the square and repeat the same thing, this time bending the sheet vertically. Unbend the workpiece. You should have a square with two intersecting lines.

3. Bend the square in half diagonally. Then straighten it and repeat the same for the other diagonal.

4. Fold each of the 4 corners of the square towards its center to form a diamond shape.

5. Bend back the two opposite corners of the diamond so that the figure looks somewhat like a “candy.”

6. We bend the side parts of the “candy” vertically (that is, those that do not have sharp tops) to form a right angle. We bend its sharp edges vertically in the same way.

7. We bend both tops of the “candy” inside the box (first one, and then the second).

8. So you have made a box. True, without a lid. The lid will also have to be made in a similar way, but to create it you need to take a square of paper a couple of millimeters larger so that it can cover the box. To decorate the box in the future, you can use paints, ribbons, pieces of fabric or glitter. Here you can show your imagination to the fullest.

How to make a box out of paper (3rd method)
Such a box looks quite stylish and can become a real decoration for your room. To create it, it is better to use either colored or textured paper.
1. Fold a square sheet of paper in half.

2. Fold the resulting triangle in half again.

3. Unfold the edge as shown below in the figure.


4. We do the same on the other side. The result is a double square.

5. We bend the corners in the same way as in the figure below. We do the same on the reverse side.

6. At this stage you should have a figure like this (see picture).

7. Unbend the bent corner along the marked lines.