Make a three-dimensional boat. How to make a paper boat with your own hands. DIY cardboard boat
You can create various crafts from a sheet of plain paper. For example, fold up a boat and send it on a short trip to a lake or small body of water. While doing this, people did not think that they would learn the basics of origami. To make a boat out of paper, you need to fold it in a certain way, following detailed instructions.
The simplest boat with a sail - video
Even kids can handle this craft.
A simple boat made of A4 paper
The manufacturing technique is reminiscent of creating a paper airplane. The master class begins with the selection of paper. It's better to take a regular A4. The office sheets are quite thick and white, making it possible to color the finished craft at your discretion.

Instructions:
- Turn A4 over, bend it, but not completely, but only marking the corner at the top. Expand again. The fold location is clearly visible.
- Using this line as a guide, first bend the left corner of the sheet towards the center. Run your finger over the bend, securing the result.
- Fold the right corner in the same way.
- Now fold one of the bottom free edges up until it reaches the bottom edge of the previously folded corners.
- Fold the second edge in the same way, but on the other side of the ship. The result was a paper hat.
- Secure the edges by forming small corners, following the pattern. Do this to both edges.
- A small triangular pocket appeared inside the workpiece. Open it and fold the product, following opposite fold lines.
- Again you get a pocket, only square in shape. Now carefully bend the free edge, only diagonally. Repeat this with the second similar edge.
- Take both edges of the workpiece and carefully stretch it. Ready! The classic boat is ready.

Origami boat
You can make a small boat out of paper. It is enough to follow the pictures reflecting the step-by-step manufacturing process. The technique is simple, even a child can do it.

Instructions:
- Fold the paper exactly in half and draw along the fold line to mark it. Expand the sheet. Fold both sides again.
- Gently bend all 4 corners of the craft inward. You will get four small folded corners. Bend them one by one again, as shown in Figure 4. The blank looks like a long, flat boat with two long edges.
- Bend the corners on the sides inward and turn them over. The boat with a small deck is ready.

Instead of white A4 sheets, you can take a newspaper or notebook sheet.
Ship - sailboat made of paper
You can make an origami boat and add sails to it. You will get a real sailboat - a sea wanderer.

What you need: a rectangular sheet of paper.

Instructions:
- Fold it vertically in half, press it tighter and unfold it back. Press both edges to the straight fold line formed in the middle.
- Wrap the top part step by step, then the bottom one inward, towards the center. You will get a square. Press tightly, now unfold back.
- Looking at the dotted lines on the diagram above, turn the corners from below one by one and align the folds so that a real trapezoid emerges. Do the same with the two upper corners.
- Turn the workpiece over. Following the lines, bend it. Press tightly and carefully unfold the finished origami ship - a sailboat.
Steamboat with two pipes
Detailed instructions with pictures will help you make a real two-pipe motor ship. The finished craft can be painted, turning the ship into either a dangerous pirate ship or a military one. Depends on the design features. If the finished craft is treated with paraffin, it will be able to float for a long time.

What you will need:
- a sheet of paper (preferably thick);
- scissors;
- paints/pencils (color the finished product if you are making it from white paper).


Step by step instructions:
To make a boat out of paper, first bend a rectangular sheet and carefully cut off the remaining excess edge. The result is a square.
- Fold it diagonally again, pressing the fold line tighter. Expand. The paper has folds visible.
- Bend one corner inward, pulling toward the center. Now bend all other corners in the same way. You will get a square.
- Turn it over and bend all its corners one by one, as you did earlier.
- Turn the workpiece over again and bend the resulting corners more evenly, directing their ends towards the center.
- Turn the workpiece over. There is no need to bend the corners anymore. Carefully unfold one pocket.
- Also unfold the second pocket opposite. Now straighten the workpiece. Great! The volumetric ship is ready. The expanded pockets are two large pipes of the vessel.
All that remains is to paint it so that the ship is colored.
Origami boat - video

You will need a piece of paper - a square.
A boat made of colored paper
Colored paper is also suitable for making boats. The main thing is to choose dense sheets. The craft requires 1 sheet. This master class will help you create a large double-decker steamship.
Instructions:
- Lay the paper down and mark two lines there, horizontal, now vertical.
- Bend the bottom half of the sheet exactly in half. Now turn the workpiece over.
- Start folding both edges of the figure inward towards a vertical, straight line in the center.
- Open the corners from the bottom of the workpiece; they will be the side of the future ship.
- Carefully fold the upper part in half and immediately bend it upward, following the photo.
- Bend the side corners of the workpiece.
- Open the figure, now following the lines outlined earlier, fold the edges of the top of the boat towards the center.
- Turn the workpiece over. Everything is ready.


Paper yacht - diagram

Paper boat - video

You will need a square sheet of paper.
How to protect a paper boat from flooding
Having understood how to make a paper boat, it is now important to find out how you can protect your ship. After all, you want to test the finished vessel in action, but paper boats, unfortunately, quickly get wet and sink!
Helpful Tips:
- Use thick paper instead of newspaper or napkins. The best thing is regular A4 or landscape sheets.
- Following the step-by-step diagram, make a boat out of paper. Do not overload it with parts, otherwise the vessel will capsize.
- Treat the bottom of the craft with Vaseline. The substance repels liquid, preventing the ship from getting wet.
Can I replace paper with cardboard? If it's thin, yes. Thick cardboard is more difficult to fold and the finished shapes turn out sloppy. The origami technique involves numerous folding and unfolding of the figure. Therefore, it is more convenient to use plain paper. For example, office A4 sheets.
Are sizes important? Small ships look more beautiful. Moreover, they are easier to make. Large-scale dimensions require more paper. You can glue several A4 sheets together or take A3, but if you make a simple boat, you need to supplement it with details. Color it beautifully, insert figures of people - passengers. But putting such a ship on a real voyage is certainly more interesting.
Children always love to do origami; they are ready to sit all day long and make some origami crafts and show them to their relatives. Any child would like to learn new origami crafts, for example, making the simplest paper boats with their own hands. Below in our master class we will teach you how to make this easy and also complicated paper sailboat with your own hands.
1. The most common version of a DIY paper boat
For the lightest boat, of course, we only need 1 sheet of A4 format. The following ten steps show you how to make origami.
You can also try to make another origami, a paper boat using a slightly more complicated pattern. As always, we will need a regular piece of A4 paper.
2. Scheme of a sailing boat.
First, we take our workpiece and bend it in half like a “book” (picture.1). Then both sides, fold them in half too (Fig. 2). Mentally divide the folded sheet into 4 parts (you can use a gray pencil), then fold the top and bottom half towards the middle (picture.3). Then we turn back the previous step (Fig.5), The result was a blank with three fold lines. Then the second half needs to be unscrewed and folded along the fold lines as on the template (Fig.5). And then fold the bottom half of the paper up (Fig.7). Do the same with the top half of the craft. (image.8). Then unfold the first folded part up (digit.9), should
look like the picture (Fig. 10). Then turn the product over to the reverse side, in front of you is a large square and four small triangles (Fig. 11). Then fold the square with opposite corners from top to bottom (under number 11). So we assembled a beautiful sailboat (Fig. 12).
3. Step-by-step instructions for origami sailboat

4. Scheme for making a paper steamship
A simple way to make a boat, an easy option in 10 minutes. 
How to make a boat out of paper detailed instructions photo
To make a boat we will need a thin sheet of A4 paper.
1. Find the middle of the workpiece. We bend it in half.

2. On the resulting rectangle, bend one corner to the middle.


4. We turn the remaining parts of the craft upward, first the front part.

5. Then, similarly to step 4, fold the other part of the paper.

6. We tuck the corners over the folded workpiece.

7. We also accurately turn the remaining corners over.

8.
Next, we take the lower corners of the triangle and connect them together. We have a big diamond .

9.
You should see a large diamond unfold .

10. Z Then we bend the lower corner of the front side of the diamond to the upper corner, and similarly with the back side.

11.
You should get three triangles.
12.
Then we connect the lower side corners to each other (the origami is folded into a small rhombus with equal sides).
13.
We take hold of different sides (the upper corners of the triangle) and begin to move them apart.
And now you have a beautiful boat with a large deck. Collect a collection of different ships on your table, made according to various designs. 
A boat made of paper is very attractive to children, because its production is very simple and at the same time exciting. And how many games can you come up with using such boats: sailing along streams in the spring, splashing around in the bathtub, and maybe even playing a sea battle. There is a lot of entertainment for children, but adults also have a lot to learn, for example, how to build a huge ship with your own hands, which will become your pride and become a decorative item.
Let's start looking at paper crafts - boats!
Paper boat for beginners with instructions
The simplest boat on A4 paper, this instruction is intended for beginner origami lovers. All you need is paper. Most of us are probably familiar with this folding method.
Origami boat with step-by-step folding photos


Paper ship for children
 This is an easy-to-make boat that kids will surely love. It is good because it is convenient to color and fantasize about the seas.
You will need a square piece of paper and glue. Follow the instructions and delight your children with wonderful boats. 


How to make a ship out of paper
This is no longer a boat, but a whole ship on which you can depict many cabins and play out interesting scenes with your child. Follow the diagram and you will get the same wonderful ship.

Paper ship diagram for printing
A large pirate ship will require more time and effort from you than a regular boat. But it will also last much longer. For this ship it is better to use thick paper.


Now you know how to fold a paper boat. I hope you find these step-by-step instructions helpful!

 A paper boat is a craft that many of us made as children. But, years later, the instructions for making such a toy are forgotten. At the same time, creating such a craft is a great way for parents and children to spend leisure time together. Believe me, preschool children are very interested in working with paper, folding various shapes. It is worth noting that the paper boat is made using the classic origami technique. This means that such an activity will benefit the child, since Japanese art involves not just play, but the development of a small person.
It will also be useful for adults to remember long-forgotten skills. Make several boats, come up with an interesting game scenario, and such a pastime will definitely bring pleasure to both you and your child. All that remains is to learn how to fold the boat. It's not difficult at all and only takes a couple of minutes.
Scientists say that it is very important for children to develop fine motor skills, since these skills help the brain develop.
Making a boat, as well as other figures using the origami technique, develops motor skills in the best possible way. This is one of the reasons why this activity has become popular.
It is worth noting that crafts only require paper. This means that parents do not need to spend a lot of money on purchasing expensive office supplies, such as paints, brushes, glue, applique paper, plasticine, and felt-tip pens. Origami is the most cost-effective method for engaging children's creativity, which will also be interesting for adults.
 Making paper crafts perfectly develops perseverance, discipline, patience, and hard work in children. Such qualities are very important when preparing a child for school. Perseverance and patience have a beneficial effect on the nervous system and psyche. Origami helps children fight childhood fears that are inherent in every child. If at the same time there is communication with parents, the effect is enhanced several times.
Making a boat, airplane, crane and other crafts develops imagination, a creative approach to any activity, and imaginative thinking. In the future, such skills will help the child better adapt to the learning process at school, and in the future to adult life. It is a creative approach that will help your child solve difficult situations in the future, find interesting solutions and be confident in their own abilities.
Origami helps to understand the basics of geometry, as it teaches the child basic concepts. Among them are the names of geometric shapes - square, triangle, rectangle, circle. The child will also remember what the median, diagonal, and vertex of a figure are. Such knowledge will simplify the process of learning school subjects. In general, it can be noted that the art of origami contains the foundations of mathematics.
Origami figures allow you to come up with a variety of games. You can put together a lot of boats and play a sea battle or come up with your own game with interesting rules. You can arrange a competition, the essence of which comes down to determining whose boat will stay afloat longer. Believe me, your child will be happy to play with his parents and will perceive this process with genuine interest. Moms and dads just have to remember the instructions for folding the boat and use a little imagination to think through an interesting plot for the game.
Classic way
To make a boat, you can use special origami paper or regular A4 office paper. Unlike most origami figures, which are made from a square-shaped sheet of material, the boat is folded from rectangular-shaped paper. Before you make a paper boat with your child, we recommend practicing.
So, the instructions involve performing the following sequential steps:

Ship with two pipes
There is a way by which you will learn how to make a paper boat in an unusual way. Such a figure will have two pipes. You should follow a simple sequence of actions:

As you can see, making such crafts is not at all difficult. A preschooler can handle them without any problems, provided that parents help. If you take colored paper, you can make very beautiful, bright boats that your baby will love.
A boat made with your own hands is a wonderful toy. Thanks to this method, you can devote time to your child and teach him new skills. In addition, such crafts do not require the purchase of expensive materials. All you need is paper and scissors. Parents should understand that the most expensive toy is not always the best. Boats made using the origami technique contribute to the development of the child.
Paper boats proudly sailing along spring streams are constant companions of our childhood. Hastily folded from torn notebook sheets, newspapers and even chocolate foil... Feeling nostalgic?
Passionate about building our cruisers, we didn’t even know that we were touching the now fashionable art of origami. So the inclinations for this creativity are inherent in each of us from childhood.
Can you make a boat out of a piece of album paper right now? Or has a once in-demand skill gradually been lost? No problem! We have prepared a wonderful selection of schemes for both experienced and novice shipbuilders. You will not only learn how to make a boat out of paper, but also replenish your creative treasury with ideas for unusual crafts.
We offer you the most common paper boat design. It is these sharp-nosed beauties that boldly plow the expanses of spring puddles and streams. Making them is a matter of a couple of minutes. And the pleasure of watching your own creation swim will delight not only the child.
Stock up on a sheet of A4 paper and patience - it’s time to start constructing a simple model of a boat. Our detailed photo instructions will help you quickly launch your first boat.

Step 1. Fold the sheet in half along the wide side. Bend it again along the wide side to mark the middle.

Step 2. Fold the top corners towards the middle of the sheet. Achieve their complete combination.


Step 3. The lower edges of the sheet remained free. Lift them up, each on his own side. Iron the folds.


Step 4. Fold the corners of the strips to form a triangle.

Step 5. As a result of these manipulations, you should end up with a triangular pocket. Stick your hand into it and open it.


Step 6. Grab the middle of the base of the triangle and gently pull in different directions. The corners of the structure will align to form a square.

Step 7 The resulting square is two-layer. Bend each of its parts diagonally to the bottom corner of the square. Again you get a triangle with a pocket inside.


Step 8 Open the resulting pocket as in step 6. You should end up with a multi-layer square.

Step 9. Take it by the upper corners and move them in opposite directions - the boat opens.

Following this step-by-step algorithm, even a schoolchild can assemble an origami boat correctly.
If you take a piece of scrap or colored paper for crafts, your creation will turn out especially bright and beautiful. Or you can make it just white and entrust a small designer to turn an ordinary ship into a masterpiece.
Double-pipe paper steamer
Having mastered the simplest model of a paper boat, you can set your sights on assembling a more complex craft. Try folding a three-dimensional steamboat with two pipes to your child’s delight. It’s just as easy to make as the previous model, but in this case you’ll have to stock up on scissors.

Stage 1 You need to cut a square from a sheet of A4 paper. To do this, fold one of the corners diagonally and cut off the excess strip.


Stage 2. Fold the resulting square along the second diagonal, they should intersect exactly in the center of the figure.

Stage 3. Gently bend each corner of the square towards the center.


Stage 4 Turn the resulting square over to the other side. Repeat the manipulation with bending the corners.


Stage 5 Turn the square over again and fold all its corners towards the center for the third time.


Stage 6. Turn the workpiece over. You see 4 pockets on the corners of the square. Reveal two of them, necessarily opposite ones. So the two pipes stated in the description appeared.


Stage 7 Grab the inner corners of the unopened pockets and move them apart - the long-awaited steamer has opened.

This, of course, is not the Titanic: it had as many as 4 pipes, although one of them was purely decorative. But our two-pipe boat is also capable of withstanding serious sailing. Hurry up, fill the bathtub with water and send him on a journey.
If you put together the craft with your children, allow them to decorate it to their liking before launching the boat. The child will be happy to turn a paper ship into a masterpiece of modern shipbuilding.
Double boat - catamaran
An ordinary boat is a completed stage, and have you also learned how to make a steamboat? Do you want to continue? Now you can master the assembly of the catamaran. The only materials you need are paper and scissors. First of all, cut out a square from an A4 sheet. Then, step by step, follow the step-by-step description, check the result with the pictures and remember that the clarity of the folds is the key to a neat and beautiful craft.

- Fold the square in half and unfold. You will be left with a fold line. Then fold each side in half towards the fold line.


- Rotate the resulting rectangle 90° and repeat the folding procedure.


- Unfold the workpiece. It turns out to be divided into small squares. Now fold the opposite sides of the square towards the center again.

- Grasp the bottom corners of the sheet and move them apart. Fold 2 inner squares diagonally - you get a blank for one boat.

- Repeat these steps on the other side of the rectangle.

- Fold the layout in half and open it, giving it volume. The catamaran is ready to sail in search of adventure.


If you didn’t succeed in figuring out this scheme the first time, don’t despair. We offer you the second assembly method. It will be easy to master even for novice shipbuilders.
The wide base of catamarans makes them stable on the water. This is enough to prevent it from capsizing and drowning at the first breath of wind. So you can safely launch it in the nearest stream - and an ordinary walk will bring you new impressions.
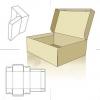
Beautiful sailboat made of cardboard
Do you want to spend time with your children fun and usefully? Help them build a realistic ship out of cardboard. This craft will decorate a child's room and become your child's favorite toy.

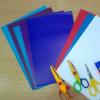
To work you will need:
- thick cardboard;
- cardboard cylinder from paper towels or foil;
- wooden stick or skewer;
- scissors;
- PVA glue;
- paper tape;
- white paper;
- paints (gouache or watercolor).
The first thing you need to do is download and print a drawing of the sailboat parts (click on the picture to enlarge). If desired, you can scale them to get the size of the finished product you need.

Transfer the patterns to cardboard and cut them out. You can use boxes from household appliances or packaging from parcels - in this case you will receive the material absolutely free.

Now the fun begins: it’s time to build. Glue the parts of the boat together with paper tape.


The mast can be made from a wooden stick or skewer. For its base, cut out several circles of cardboard and string them onto a stick, gluing them together. Glue the mast base to the deck.


Dilute PVA with water in a ratio of 2:1. Tear the paper into small pieces. Soak each piece in the adhesive mixture and stick it on the ship. Thus, you need to glue 5 layers of paper onto the workpiece. Try to create a smooth surface. Let your creation dry completely.

Now comes the decorating stage. Entrust this to the children - they will be happy to realize their fantasies.

You can make real sails from fabric. If you don't want to mess with it, cut them out of a thick cardboard cylinder and attach them to the mast.

Such a chic toy ship will occupy the attention of young sailors for a long time. This is also a good idea for a craft for kindergarten or a gift from a child to older family members.

Colorful sailboat made from matchboxes and cardboard
Do you have an ordinary matchbox in your household? Then invite your child to engage in exciting shipbuilding. It is not only possible, but very simple and interesting.

For work, prepare:
- 3 matchboxes;
- colored cardboard and paper;
- PVA glue;
- scissors.
Such an original sailboat is easy to make at home, because you don’t need any templates or stencils for it. But the skills of gluing and cutting will come in handy.
The matchboxes need to be glued together, placing them as shown in the photo.

Cut a strip of cardboard, its width should be equal to the width of the box. Carefully cover the boxes with it, trim off the excess.

Cut a second strip of cardboard 1.5 centimeters wide. Fold it in half.

Glue it to the blank, paying special attention to the bow of the ship. Place the unfinished ship on the cardboard and trace the outline. Cut out the bottom of the ship and glue it to the workpiece.

For the mast, take ¼ of an A4 sheet. It needs to be rolled diagonally into a tight tube. Make a hole in the top of the ship for the mast. Install the mast, lubricating it with glue.

Cut out the sails and flag. Naturally, let your child color them. Make holes in the sails, put them on the mast and secure them with a flag. The sailboat is ready to conquer the seas and oceans.

Simple paper boat with sail
We have found for you another way to make a paper boat. This model, unfortunately, is not capable of swimming, but it will successfully cope with two tasks at once:
- development of fine motor skills in children;
- organization of exciting and useful leisure time.
Carefully study the assembly diagram of the model and you will be able to teach your children their first origami lesson.

Cut a square from a regular sheet of office paper.


The finished sailboat can be painted so that it sparkles with bright colors. The resulting beauty with two sails will definitely delight and entertain the kids.
Video bonus: sailboat
Feeling empowered to create more complex origami? At your service is a video master class on assembling an unusual sailboat. The deck is assembled separately, then a mast with a sail is attached to it. Watch the craftsman's hands carefully: one wrong bend in your work and the whole process will have to start again.
Folding and launching paper boats will help adults return to childhood at least for a little while. And for children, this is another reason to leave the virtual reality world of modern gadgets and feel like real creators and captains of their own ships.


Perhaps the first folded boat will be a step towards a serious passion for the art of origami. Encourage your children's creativity, help them discover new talents and develop their abilities.
They may not be lucky enough to develop a new model that will conquer the Internet, or design the supership of the future, but you will definitely have a fun and useful time. And this is the main goal of any creativity.
*© MirPozitiva, when copying text material, please indicate an active link to the source